
Get started
Install Studio
Studio is a Windows app. It reads GTA V’s own files on your PC, so nothing from Rockstar ships with it.
What you need
- A Windows 10 or 11 PC (64-bit). The WebView2 runtime Studio uses comes with both.
- GTA V installed on the same PC. Studio finds it by itself: Rockstar, Steam and Epic installs, and the game folder FiveM uses.
- CodeWalker, to save the building you want to build in from the game’s archives (see Import).
Install it
- Download the setup. Beta testers get it from the beta page; buyers get the link with their licence key.
- Run it. If Windows SmartScreen warns about an unknown app, click More info › Run anyway.
- Click Install. Studio installs for your Windows user only, in
AppData\Local\Programs\MNIMIZE Studio, so no admin rights are needed. It goes in the Start menu, on the desktop if you leave that switch on, and in Windows’ list of apps, where you can uninstall it again. Uninstalling keeps your projects inDocuments\MNIMIZE Studio.
Rather not install it? Download the zip instead, unzip it into a folder you can write to (not Program Files: Studio updates itself in place) and start MnimizeStudio.exe.
Updates
Studio checks for a new version every time it starts and downloads it in the background. When it’s ready, the status bar says Update x.y.z ready · Restart. Click it, or the update installs the next time you open Studio. Your projects aren’t touched.
Sign in
The first time Studio starts, it asks for your licence. There are two ways:
With Discord
- Click Sign in with Discord. Your browser opens mnimize.com.
- Sign in with the Discord account you bought Studio with (beta testers: the account with the Beta Tester role).
- Check that the four-letter code in the browser is the one Studio shows, then click Sign in to Studio. Studio carries on by itself.
A sign-in link works for 10 minutes and only once. If it runs out, start again from Studio.
With your licence key
Paste the key from your licence email, from mnimize.com/licence or from the beta page. Bought without Discord? You can link the key to your Discord account on your account page.
PCs and working offline
- A licence works on 2 PCs at a time. To move it, sign the old PC out in Studio’s settings or on your account page.
- Studio checks the licence with mnimize.com when it starts, and keeps working offline for up to 30 days between checks. Beta keys need a check every 7 days.
Your first interior
Every project goes through the same ten steps, on the rail down the left of the window. Each step has a short checklist; when its required items are ticked, Next takes you on. The short version:
- Import the building’s files, saved from the game with CodeWalker.
- Place it where it stands in the world, straight from its
.ymap. - Square up the grid to a wall and set the floor height.
- Draw the rooms on the floor. Walls, floor and ceiling are made for you.
- Add openings: doors, windows, archways and stairs. At least one has to lead outside.
- Clean up the building’s faces and collision that are in the way.
- Add props from the game, pipes and customer desks.
- Finish the floors, walls and ceilings, and choose what players can change.
- Check it: fix what the checklist finds and look at the budget.
- Export the resource, copy it to your server and
ensureit.
Try the demo on the welcome screen opens a built-in building, so you can try every tool before you import anything. The demo isn’t saved.
Projects
File › New project… (Ctrl N) asks for a name and what you’re making:
| Kind | What it is |
|---|---|
| Interior | An MLO inside a GTA V building. Any room in it can also be a storage unit or a lab. Starts at Import. |
| Rentable interior | No building: rooms on a grid, hidden underground, with a copy per upgrade level for a housing script to rent out. Starts at Rooms. See Rentable interiors. |
| New building | Coming later. |
- Projects save by themselves a moment after every change. Ctrl S saves at once. The title bar says Saved, Saving, Unsaved or Save failed.
- Edit › Undo (Ctrl Z) goes back up to 100 steps; Redo is Ctrl Y.
- File › Projects… lists your projects; File › Show project folder opens the one you’re in. A deleted project goes to
Projects\.trash, so you can get it back.
The editor
| Part | What’s in it |
|---|---|
| Title bar | The File, Edit, View and Help menus, the project’s name, whether it’s saved, how many steps are done, and Export. Drag it to move the window; double-click it to maximise. |
| Step rail | The ten steps. A step opens once every step before it is done. Clean up is the exception: it opens as soon as a model is imported. |
| Step panel | What the step is for, its checklist (optional items are marked), its tools and Next. Items still to come are listed under In development. |
| Viewport | The 3D view. Its toolbar switches Textured, Solid and Wire, X-ray, Collision (once a .ybn is imported) and Cutaway, which cuts away everything 1.5 m above the floor you’re working on. Drop files on it to import them. |
| Side panel | Inspector shows whatever is selected: a room, an opening, a prop, a desk. Scene lists everything in the project. |
| Status bar | Hints for the tool you’re using, the X Y Z under the cursor, and updates. |
Help › Settings… has the interface size (85 to 130%), the orbit speed and Invert wheel zoom.
Controls
F1 shows them in the app too.
Camera
| Orbit around the point under the cursor | Right-drag, or Alt + left-drag |
| Pan | Middle-drag |
| Zoom towards the cursor | Wheel |
| Fly | Hold the right button: W A S D, Q down, E up, Shift faster, wheel sets the speed |
| Focus on a point | Double-click |
| Frame the selection / everything | F / Home |
| Top / front / right view | T or Num 7 / Num 1 / Num 3 (with Ctrl: the other side) |
| Perspective or orthographic | Num 5 |
| Turn the view 90° | Q / E |
| Cutaway on or off | C |
| X-ray | Alt Z |
Tools
| Key | Tool | Step |
|---|---|---|
| O | Square to a wall | Building |
| 1 | Add room · Select faces | Rooms · Clean up |
| 2 3 | Fill room, Trace room | Rooms |
| 4 5 6 7 | Door, Window, Archway, Stairs | Openings |
| 8 | Pipe | Props |
| P | Paint | Finish |
| V | Select and edit (puts the tool away) | Any |
Editing
| Snap to 50 cm instead of 5 cm | Hold Shift |
| No snapping | Hold Ctrl |
| Nudge the selection 5 cm (50 cm) | Arrow keys (with Shift) |
| Turn a prop 90° (15°) | R (Shift R) |
| Finish a traced room or a pipe | Enter |
| Take back the last corner or bend | Backspace |
| Delete the selection | Delete |
| Cancel, stop the tool, deselect | Esc |
| Copy and paste a room, with its openings, props and pipes | Ctrl C / Ctrl V |
| Undo / redo | Ctrl Z / Ctrl Y |
| Import files | Ctrl I |
The ten steps
From a GTA V building to a FiveM resource
The screenshots in this guide come from a storage facility I built for my own server, with 35 units inside an existing GTA V building.
Step 01
Import the building
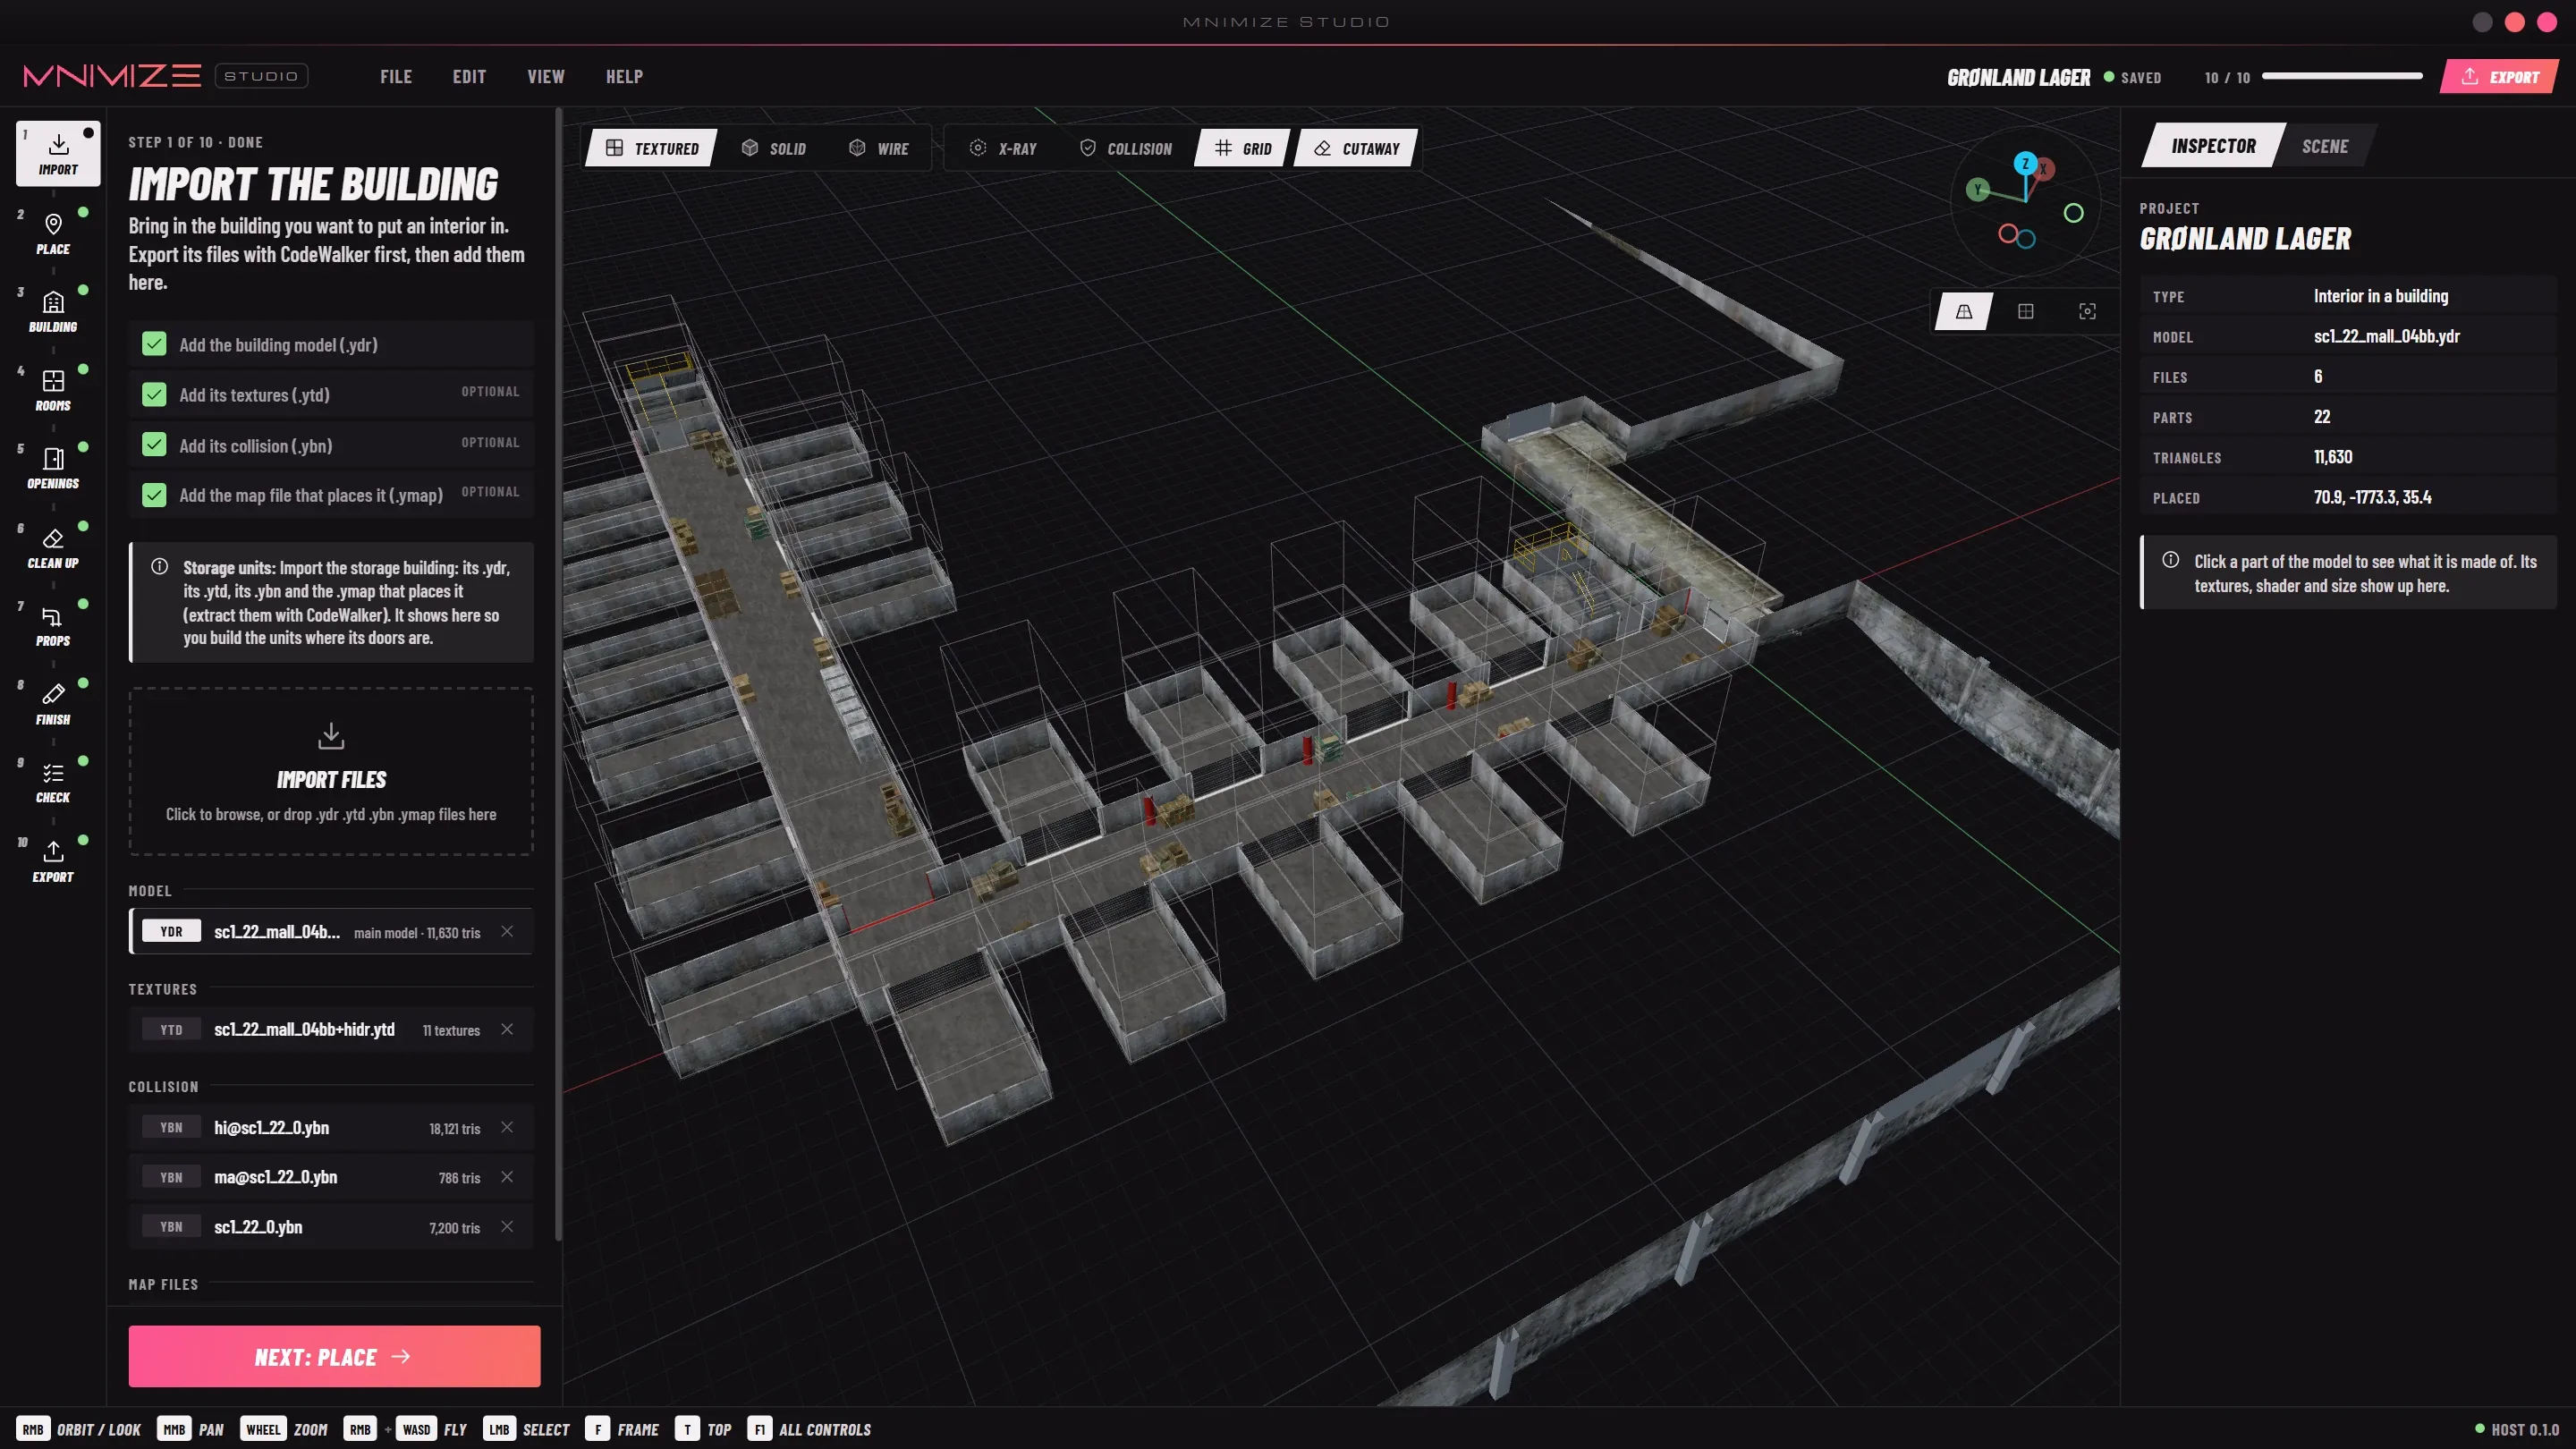
Pick a building in the game that you want an interior in, and save its files from the game’s archives with CodeWalker’s RPF Explorer:
| File | What it is | |
|---|---|---|
.ydr | The building’s model | Needed |
.ytd | Its textures, so it looks right and you can use them in your rooms | Optional |
.ybn | Its collision, so you can clean it up where your doors go | Optional |
.ymap | The map file that places it, so Place is one click | Optional |
Drop them on the drop zone or the viewport, or use Import files (Ctrl I). Studio also takes .yft, .ydd and .ytyp. The files are copied into the project; importing a file with the same name replaces the old one.
- The biggest model becomes the main model, the building you build in. Click the target icon next to another model to use that one instead.
- Other models are placed by their own entry in an imported
.ymap. If none places them, they’re marked not placed. - A
.ytypfrom another resource adds its doors to the door list. That resource then has to run on your server too.
In CodeWalker’s world view, click the building to see its model’s name and the .ymap it’s in. Then find those files in the RPF Explorer and save them.
Step 02
Place it in the world
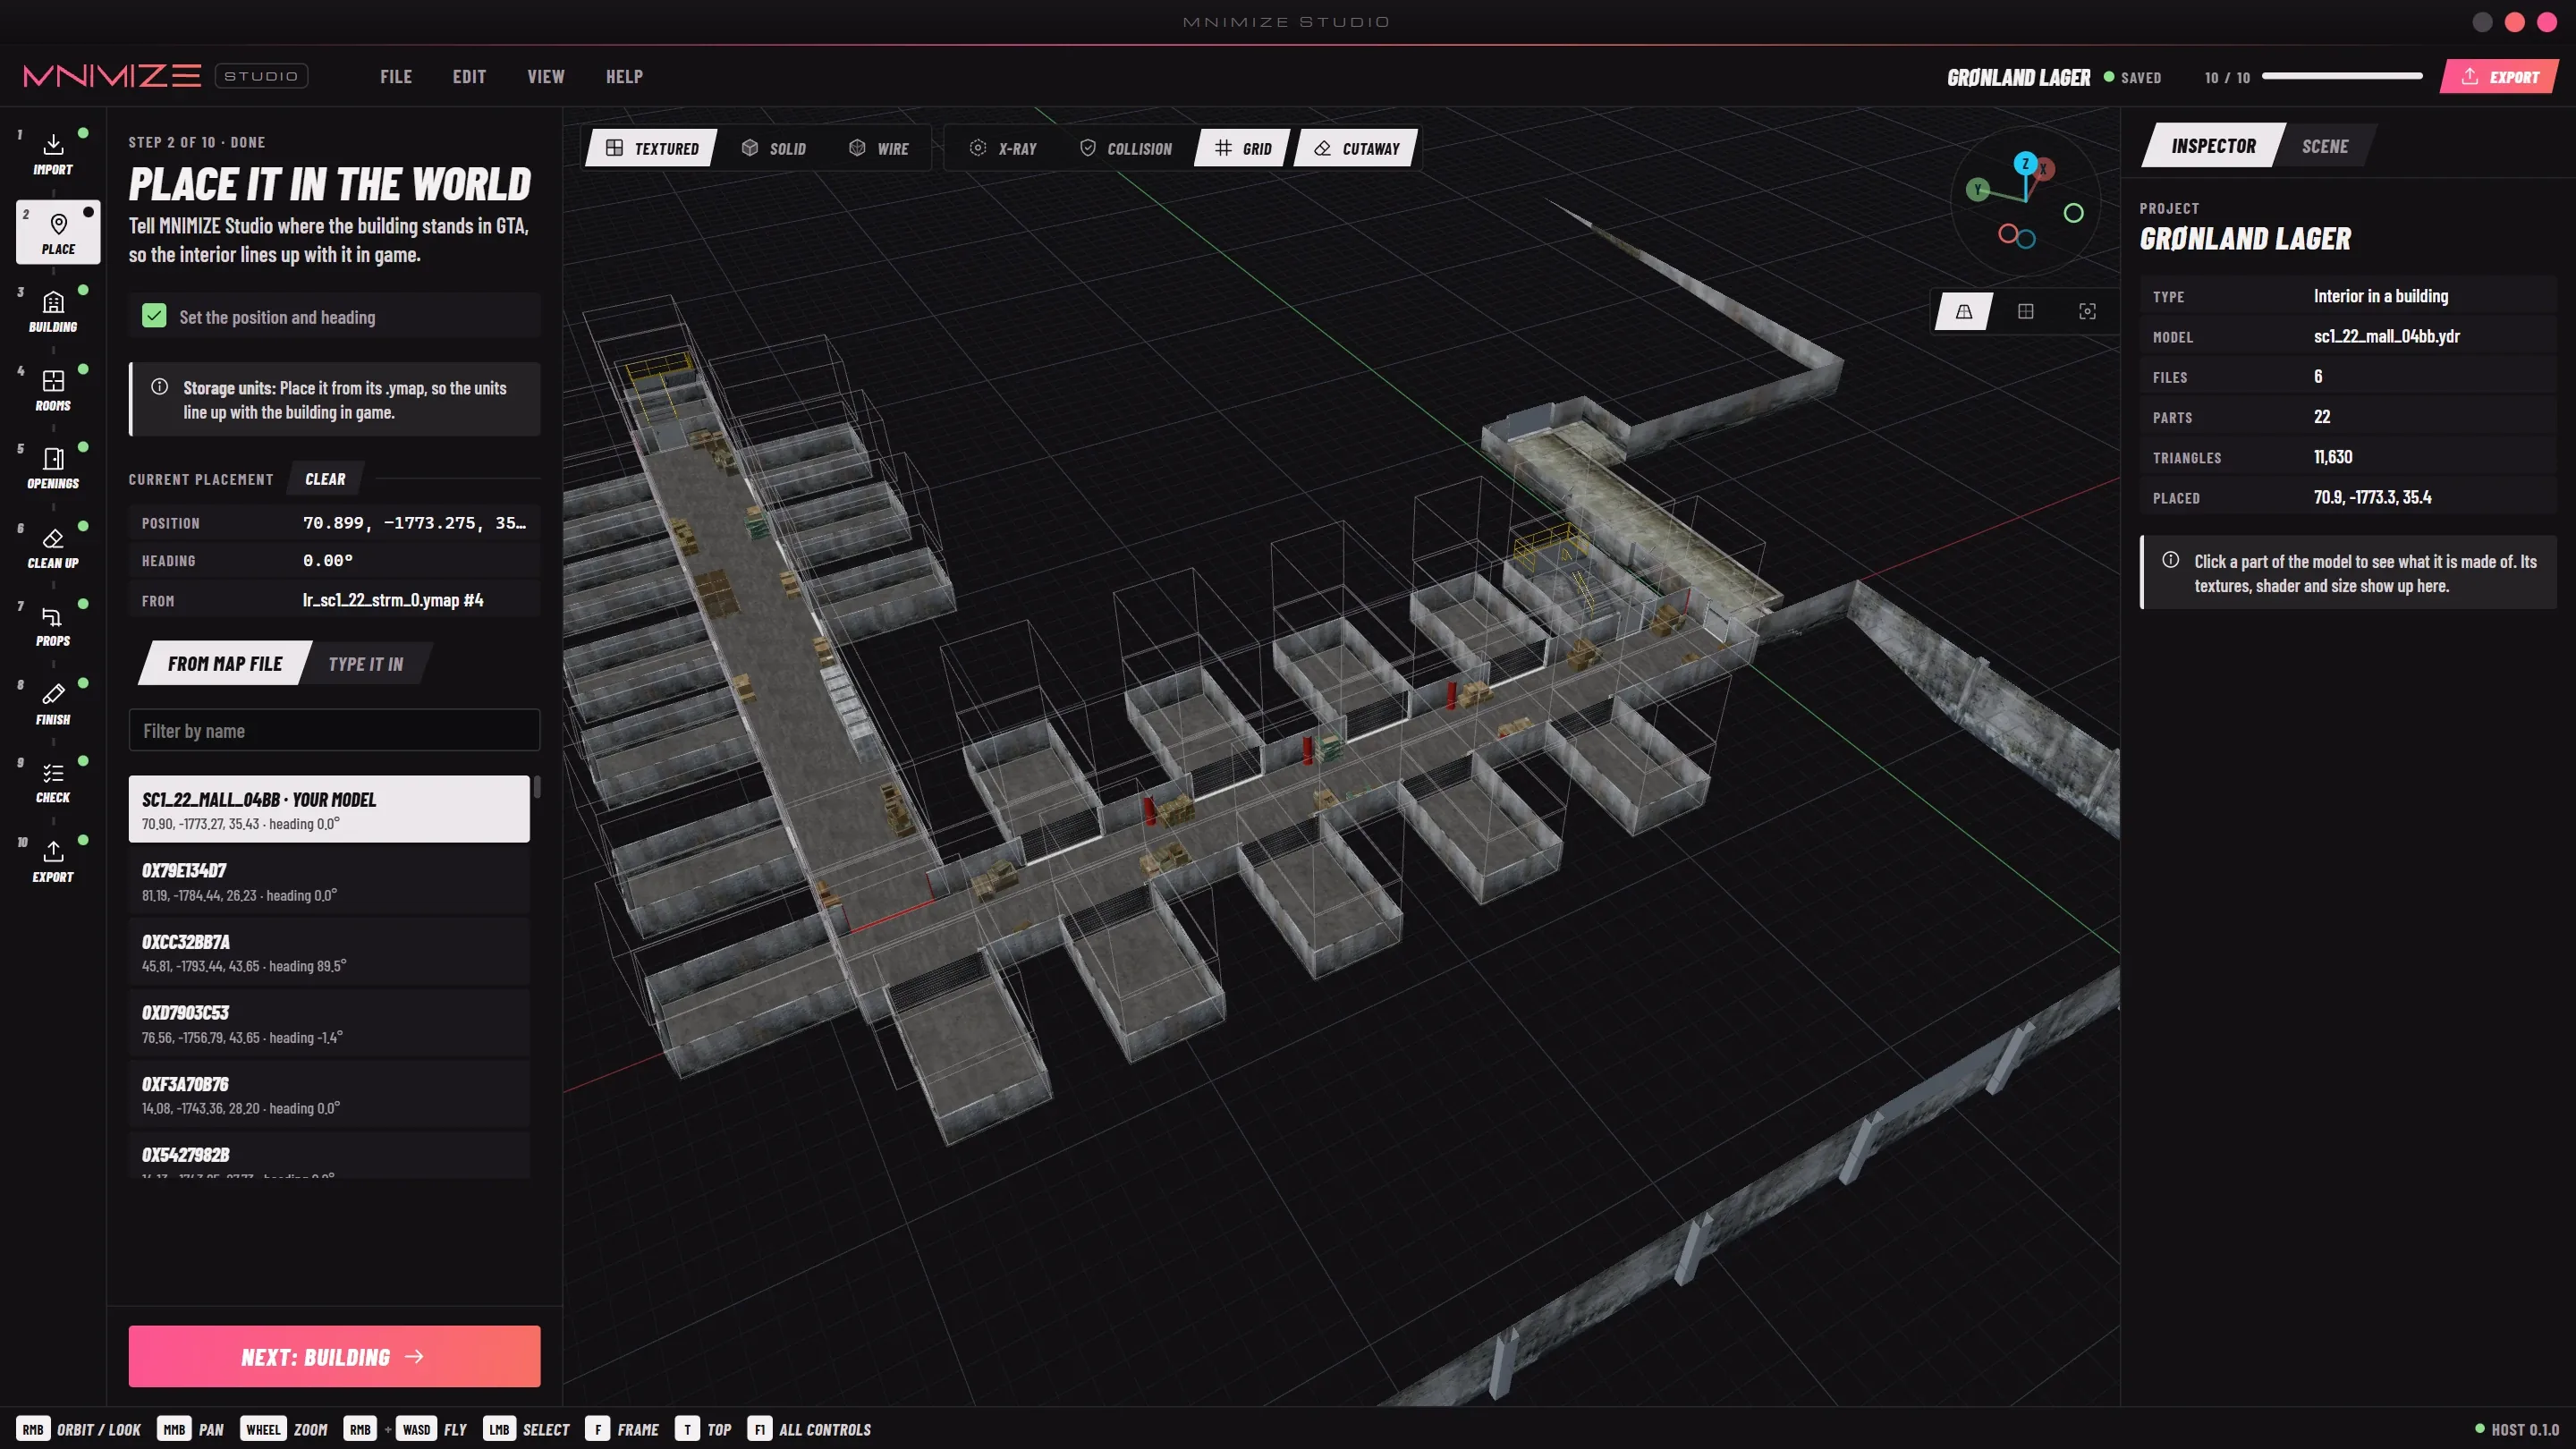
Studio needs to know where the building stands in GTA, so the interior lines up with it in game. There are two tabs:
- From map file lists what the imported
.ymapplaces, with your model first (· your model). Click it and the building goes exactly where the game has it. Filter by name narrows the list. - Type it in: paste a position from the game into Paste from the game. It takes
vec4(x, y, z, h),vector3(x, y, z)or plainx, y, z, h. Then Place here. A typed position is where the model’s origin goes, so the map file is the more exact way.
Only the heading is used, so the interior is always level. If the map tilts the model, Studio says so.
Step 03
Square up the building
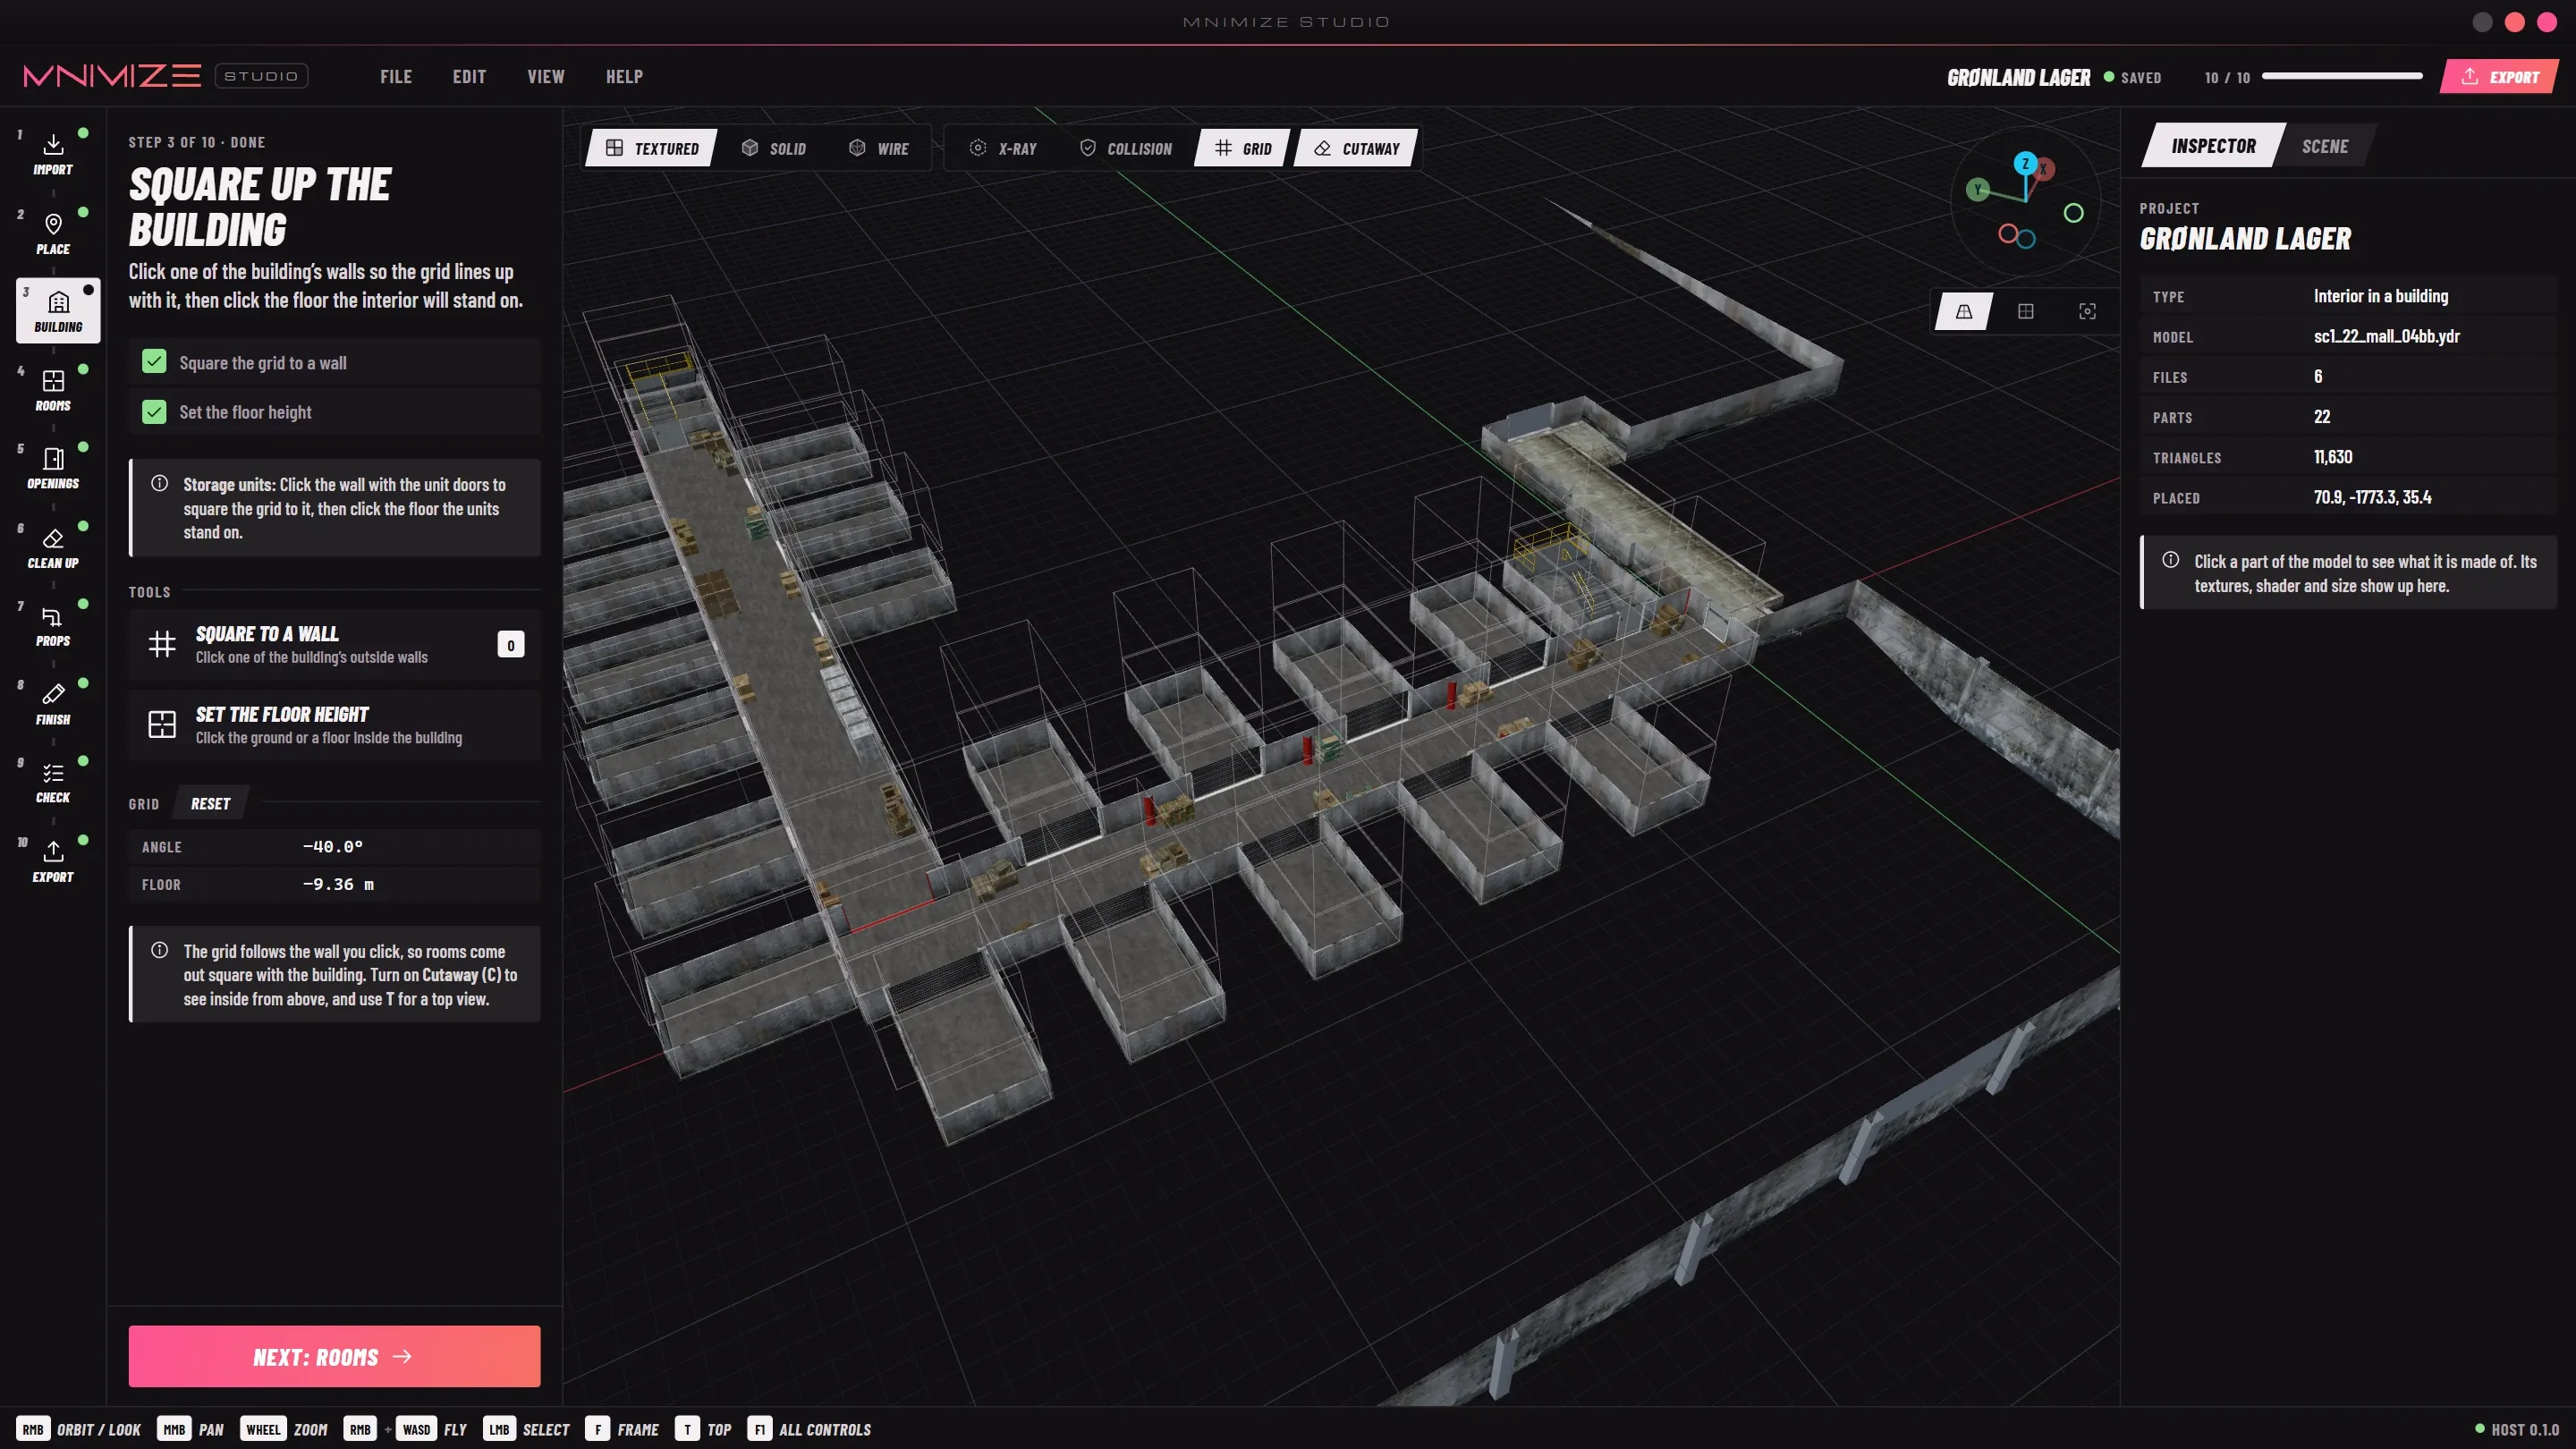
Rooms are drawn on a grid. This step lines the grid up with the building:
- Square to a wall (O): click one of the building’s outside walls. The grid turns to match it.
- Set the floor height: click the ground or the floor the interior will stand on.
The Grid panel shows the angle and the floor height; Reset goes back to the model’s own axes. Cutaway (C) and the top view (T) make the floor easier to reach.
Rooms snap to the building’s walls only where they run along the grid, so a squared grid is what makes rooms fit the building.
Step 04
Draw the rooms
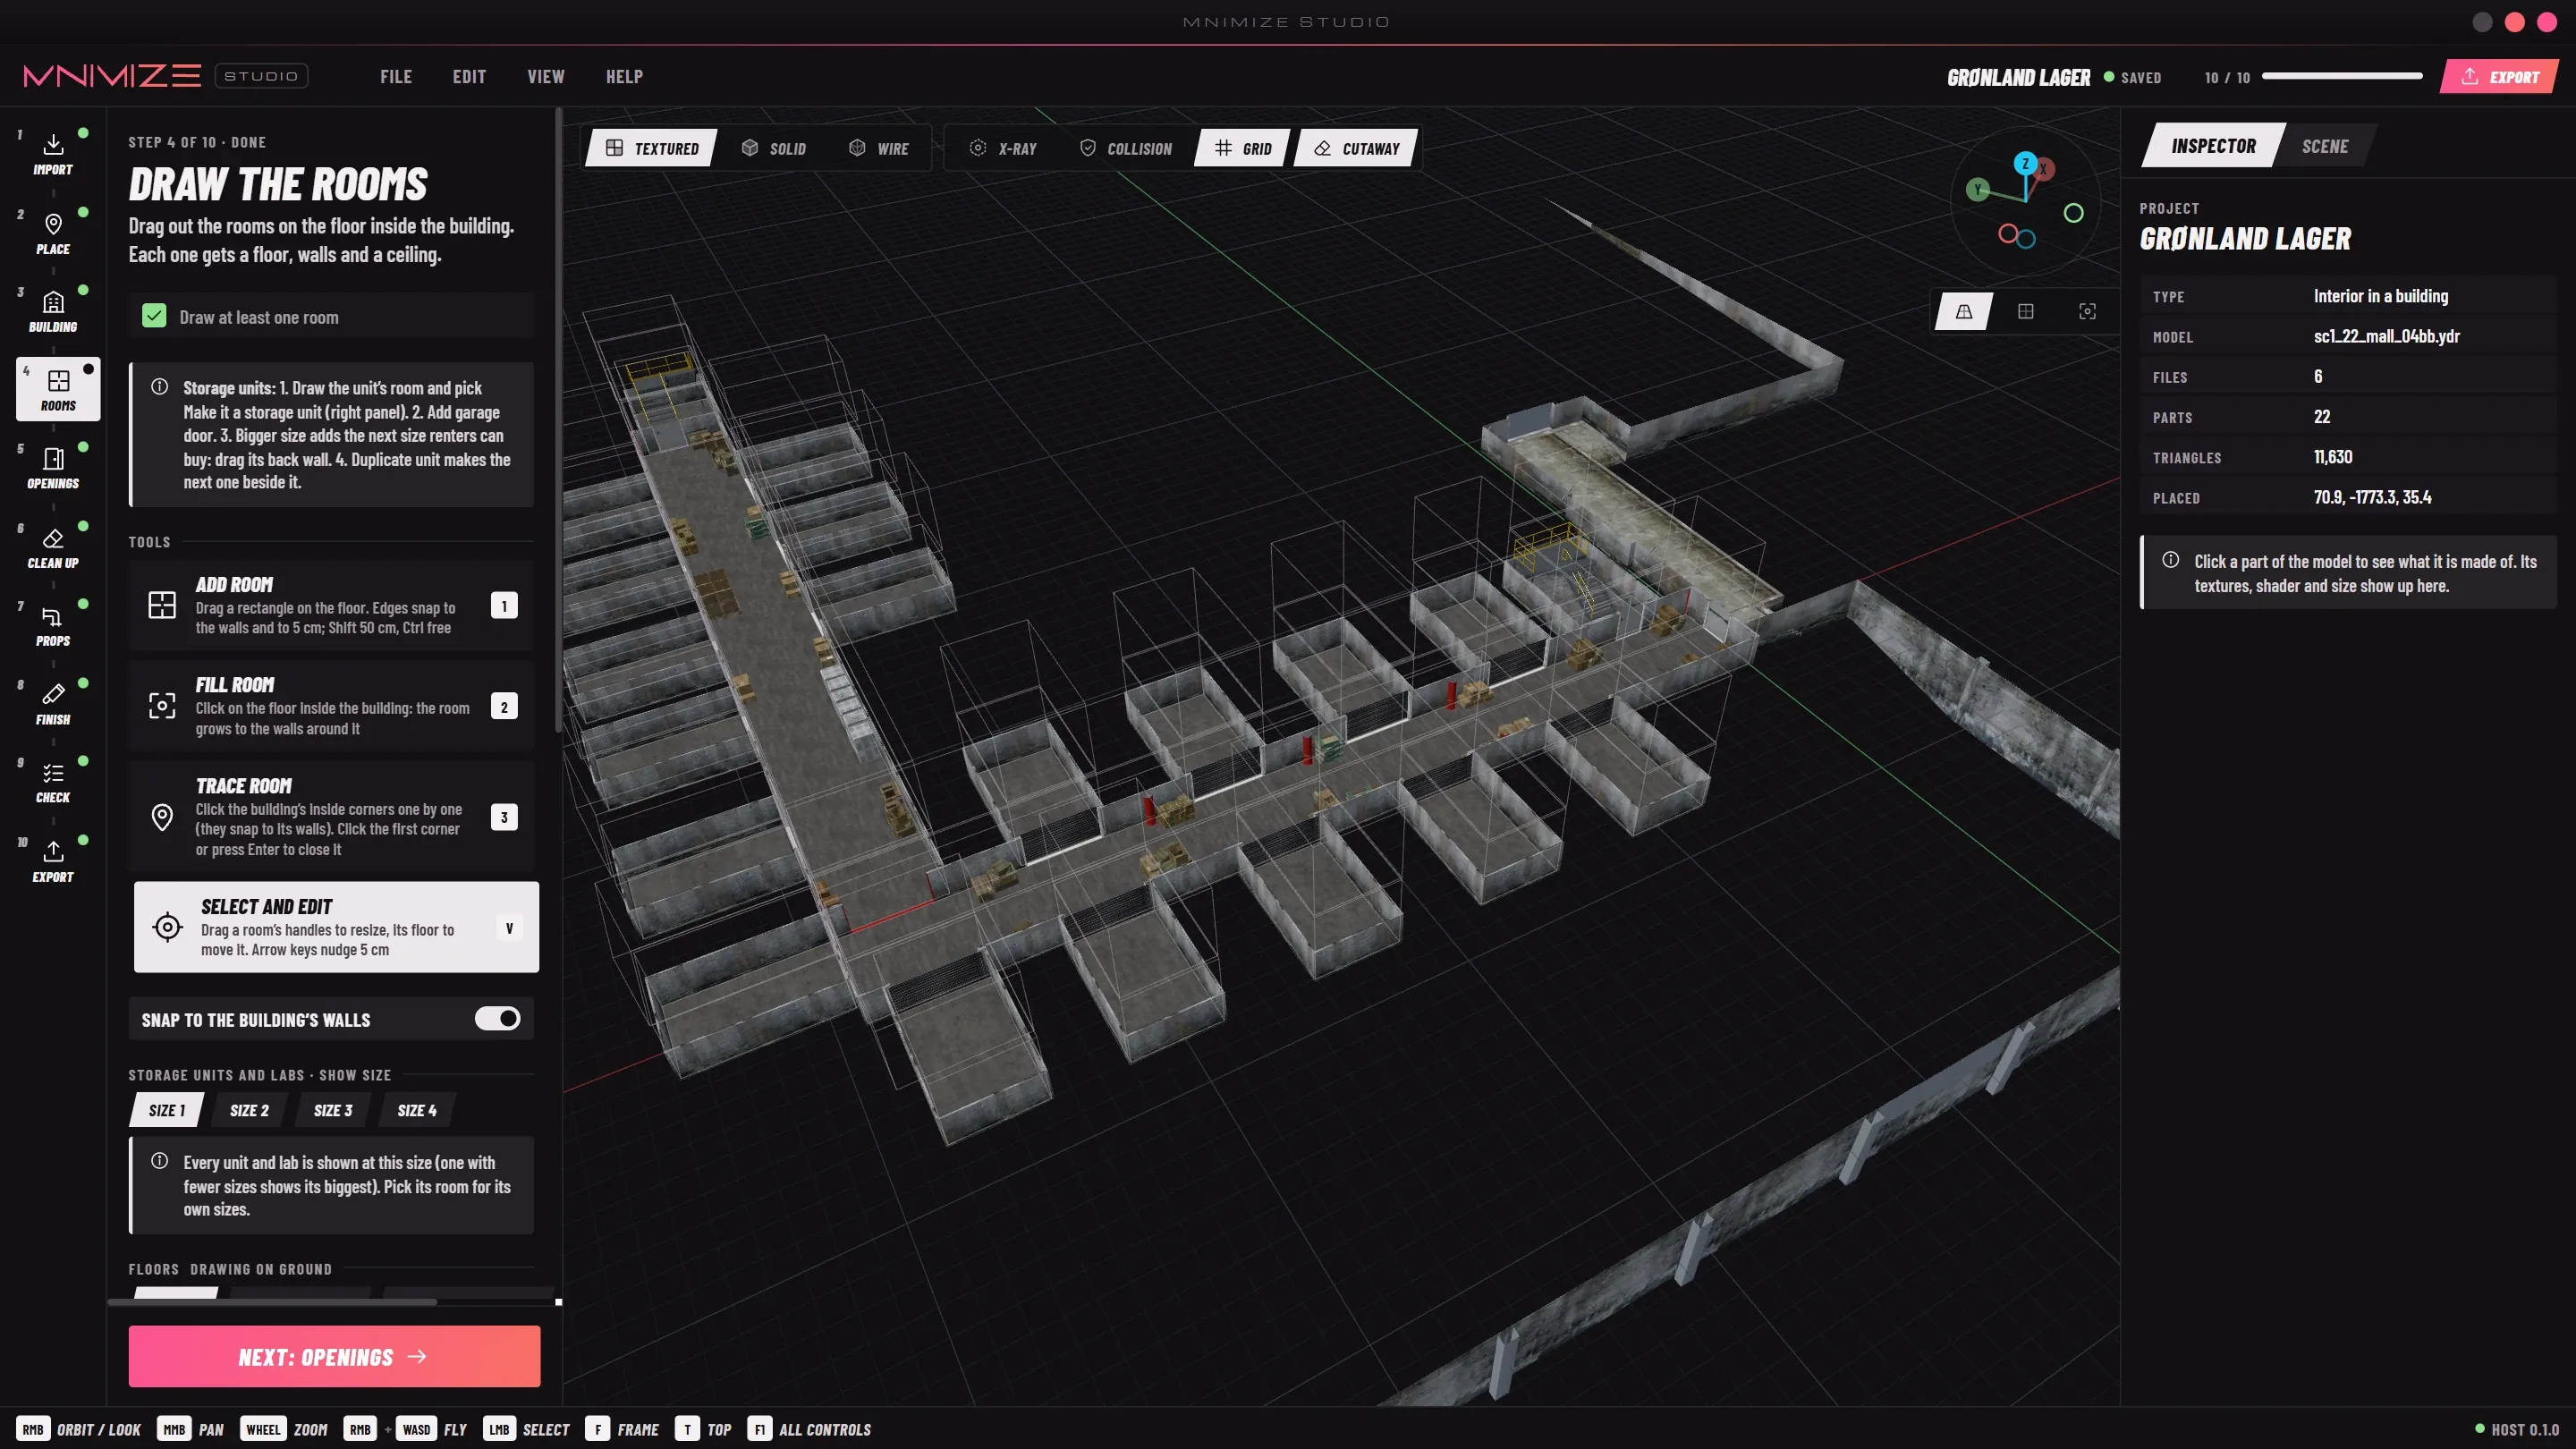
Each room gets a floor, walls and a ceiling. Four tools:
| Add room 1 | Drag a rectangle on the floor. The size and area show as you drag. |
| Fill room 2 | Click the floor and the room grows to the walls and rooms around it. A side with no wall stops 2 m out. |
| Trace room 3 | Click the corners one by one for an L-shape or any other shape with square corners. Click the first corner or press Enter to close it; the last wall is squared for you. |
| Select and edit V | Drag the handles to resize, drag the floor to move. Arrows nudge it; Delete removes it. |
Snapping
Edges snap to the building’s walls (Snap to the building’s walls), then to other rooms, then to rooms on other floors, and otherwise to a 5 cm grid. Shift gives 50 cm, Ctrl turns snapping off.
Walls between rooms
Two rooms next to each other share a wall: the gap between them. Walls between rooms sets how thick (10, 15, 20 or 30 cm; 15 to start with), and snapping leaves exactly that gap. If shared walls end up thinner, the panel offers to fix them. Outer walls reach back to the building’s own wall by themselves.
Ceiling height for new rooms is 2.8 m to start with (2.6, 2.8, 3.0 or 3.5).
The room inspector
- Fit to walls grows a rectangle to the building’s walls. Fit height raises the ceiling to what’s above. Fit floor drops the floor onto the building’s floor.
- Width, Depth, Height and Floor (m up) take exact sizes.
- Same size as … copies the outline of the room above or below.
Floors, split levels and stairs
The Floors section picks the floor you’re drawing on; the grid and the cutaway follow it. + Floor above starts a new one, and a floor’s Height above the ground floor moves every room on it.
- Floors less than 1.5 m apart are split levels. They share walls and doors, and a door between them gets steps on the lower side by itself (railings from a 50 cm rise).
- Floors 1.5 m or more apart need stairs, which go in at the Openings step.
Step 05
Doors and windows
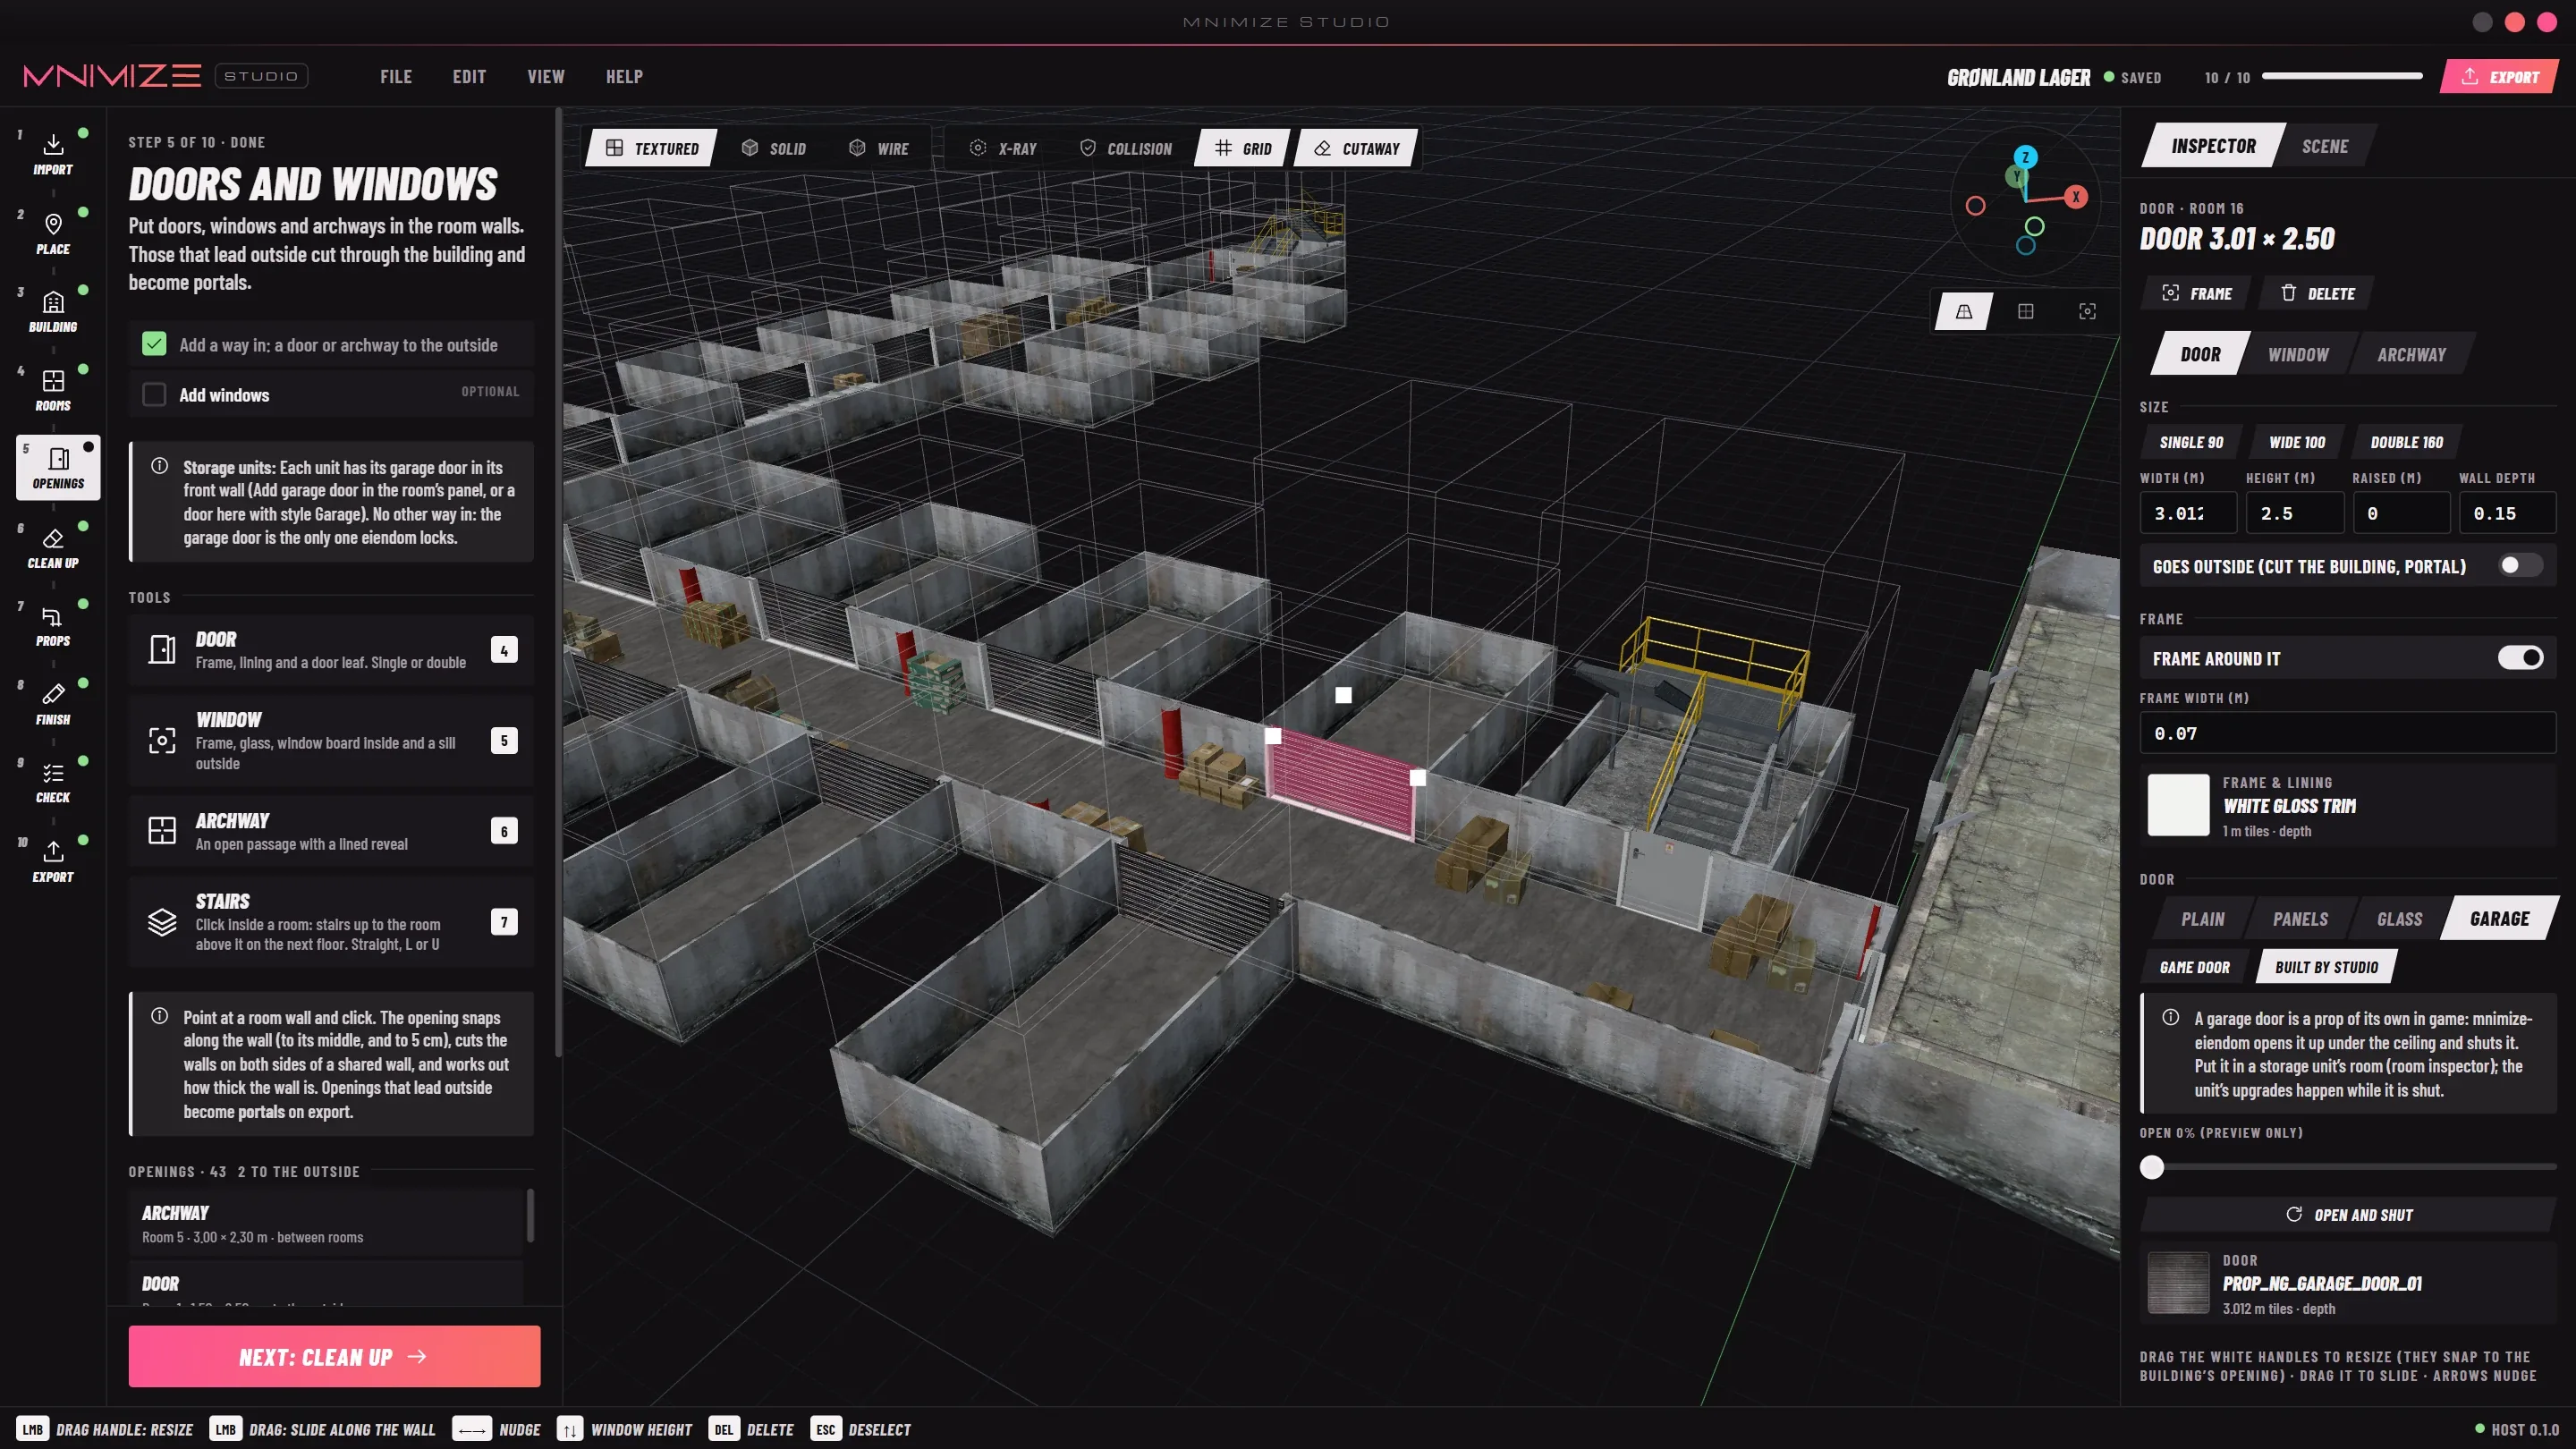
Pick Door (4), Window (5) or Archway (6) and click a room’s wall. The opening snaps to the middle of the wall or to 5 cm, and if there’s a hole in the building’s wall behind it, it takes the hole’s size.
| Kind | Size to start with | Presets |
|---|---|---|
| Door | 0.90 × 2.10 m | Single 90, Wide 100, Double 160 |
| Window | 1.20 × 1.20 m, sill at 0.90 m | Small, Standard, Wide, Tall |
| Archway | 1.20 × 2.30 m | Standard, Wide |
Outside, or between rooms
Studio works out where an opening leads: if another room is right behind the wall, it’s between rooms; otherwise it goes to the outside. Every opening becomes a portal: the outside ones to the world outside, the others from room to room. Goes outside in the inspector overrides the guess.
The interior needs at least one door or archway to the outside; until it has one, Props and Finish stay locked.
An opening to the outside doesn’t cut the building’s own wall yet. Delete the faces and collision in front of it at the Clean up step, or players walk into the building’s wall.
The opening inspector
- Size: presets, or Width (0.4 to 6 m), Height, Sill for windows, Raised for doors and archways above the floor, and Wall depth. Fit to the building’s opening snaps it to the hole behind it.
- Frame around it, with its width and its texture.
- Doors: Plain, Panels, Glass or Garage; Game door or Built by Studio; Double door and the hinge side. Open and shut shows it moving.
- Windows: one, two or four panes, a window board inside and a sill outside.
- Drag the white handles to resize (they snap to the building’s opening), drag the opening to slide it along the wall, and nudge it with the arrows. ↑ ↓ move a window’s sill.
Game doors
A new door starts as one of the game’s own doors. Game door opens a list of all 575 door models in GTA V, plus those in any .ytyp you imported. Search it by name (v_ilev, garage); it lists the doors closest to your opening’s width first. Fit the opening to it makes the opening the door’s size. If the opening is bigger than the door, Studio fills the gap around it.
How doors open in game
- Game doors and doors built by Studio (Plain, Panels, Glass) are real game doors in the portal: the game swings them, and door-lock scripts can lock them.
- Garage doors open in storage units, where your housing script runs them. In any other room a garage door is fixed shut.
Doors above the floor
When a door sits higher than the floor next to it, Studio adds steps up to it, with a landing the door swings over. Under 5 cm is just a lip. At 1.5 m or more, Check asks for stairs instead.
Stairs
Stairs (7): click inside a room. The stairs climb to the room above, which gets a hole with a railing round it and a portal.
- Shape: Straight, L-shaped or U-shaped. Style: Solid, Floating, Stringers or Steel.
- Railings: Auto, both sides, left, right or none. Width: 80 to 150 cm.
- Climbs is worked out from the room above; type a height to set it yourself. Drag to move, R to turn.
Step 06
Clean up the model
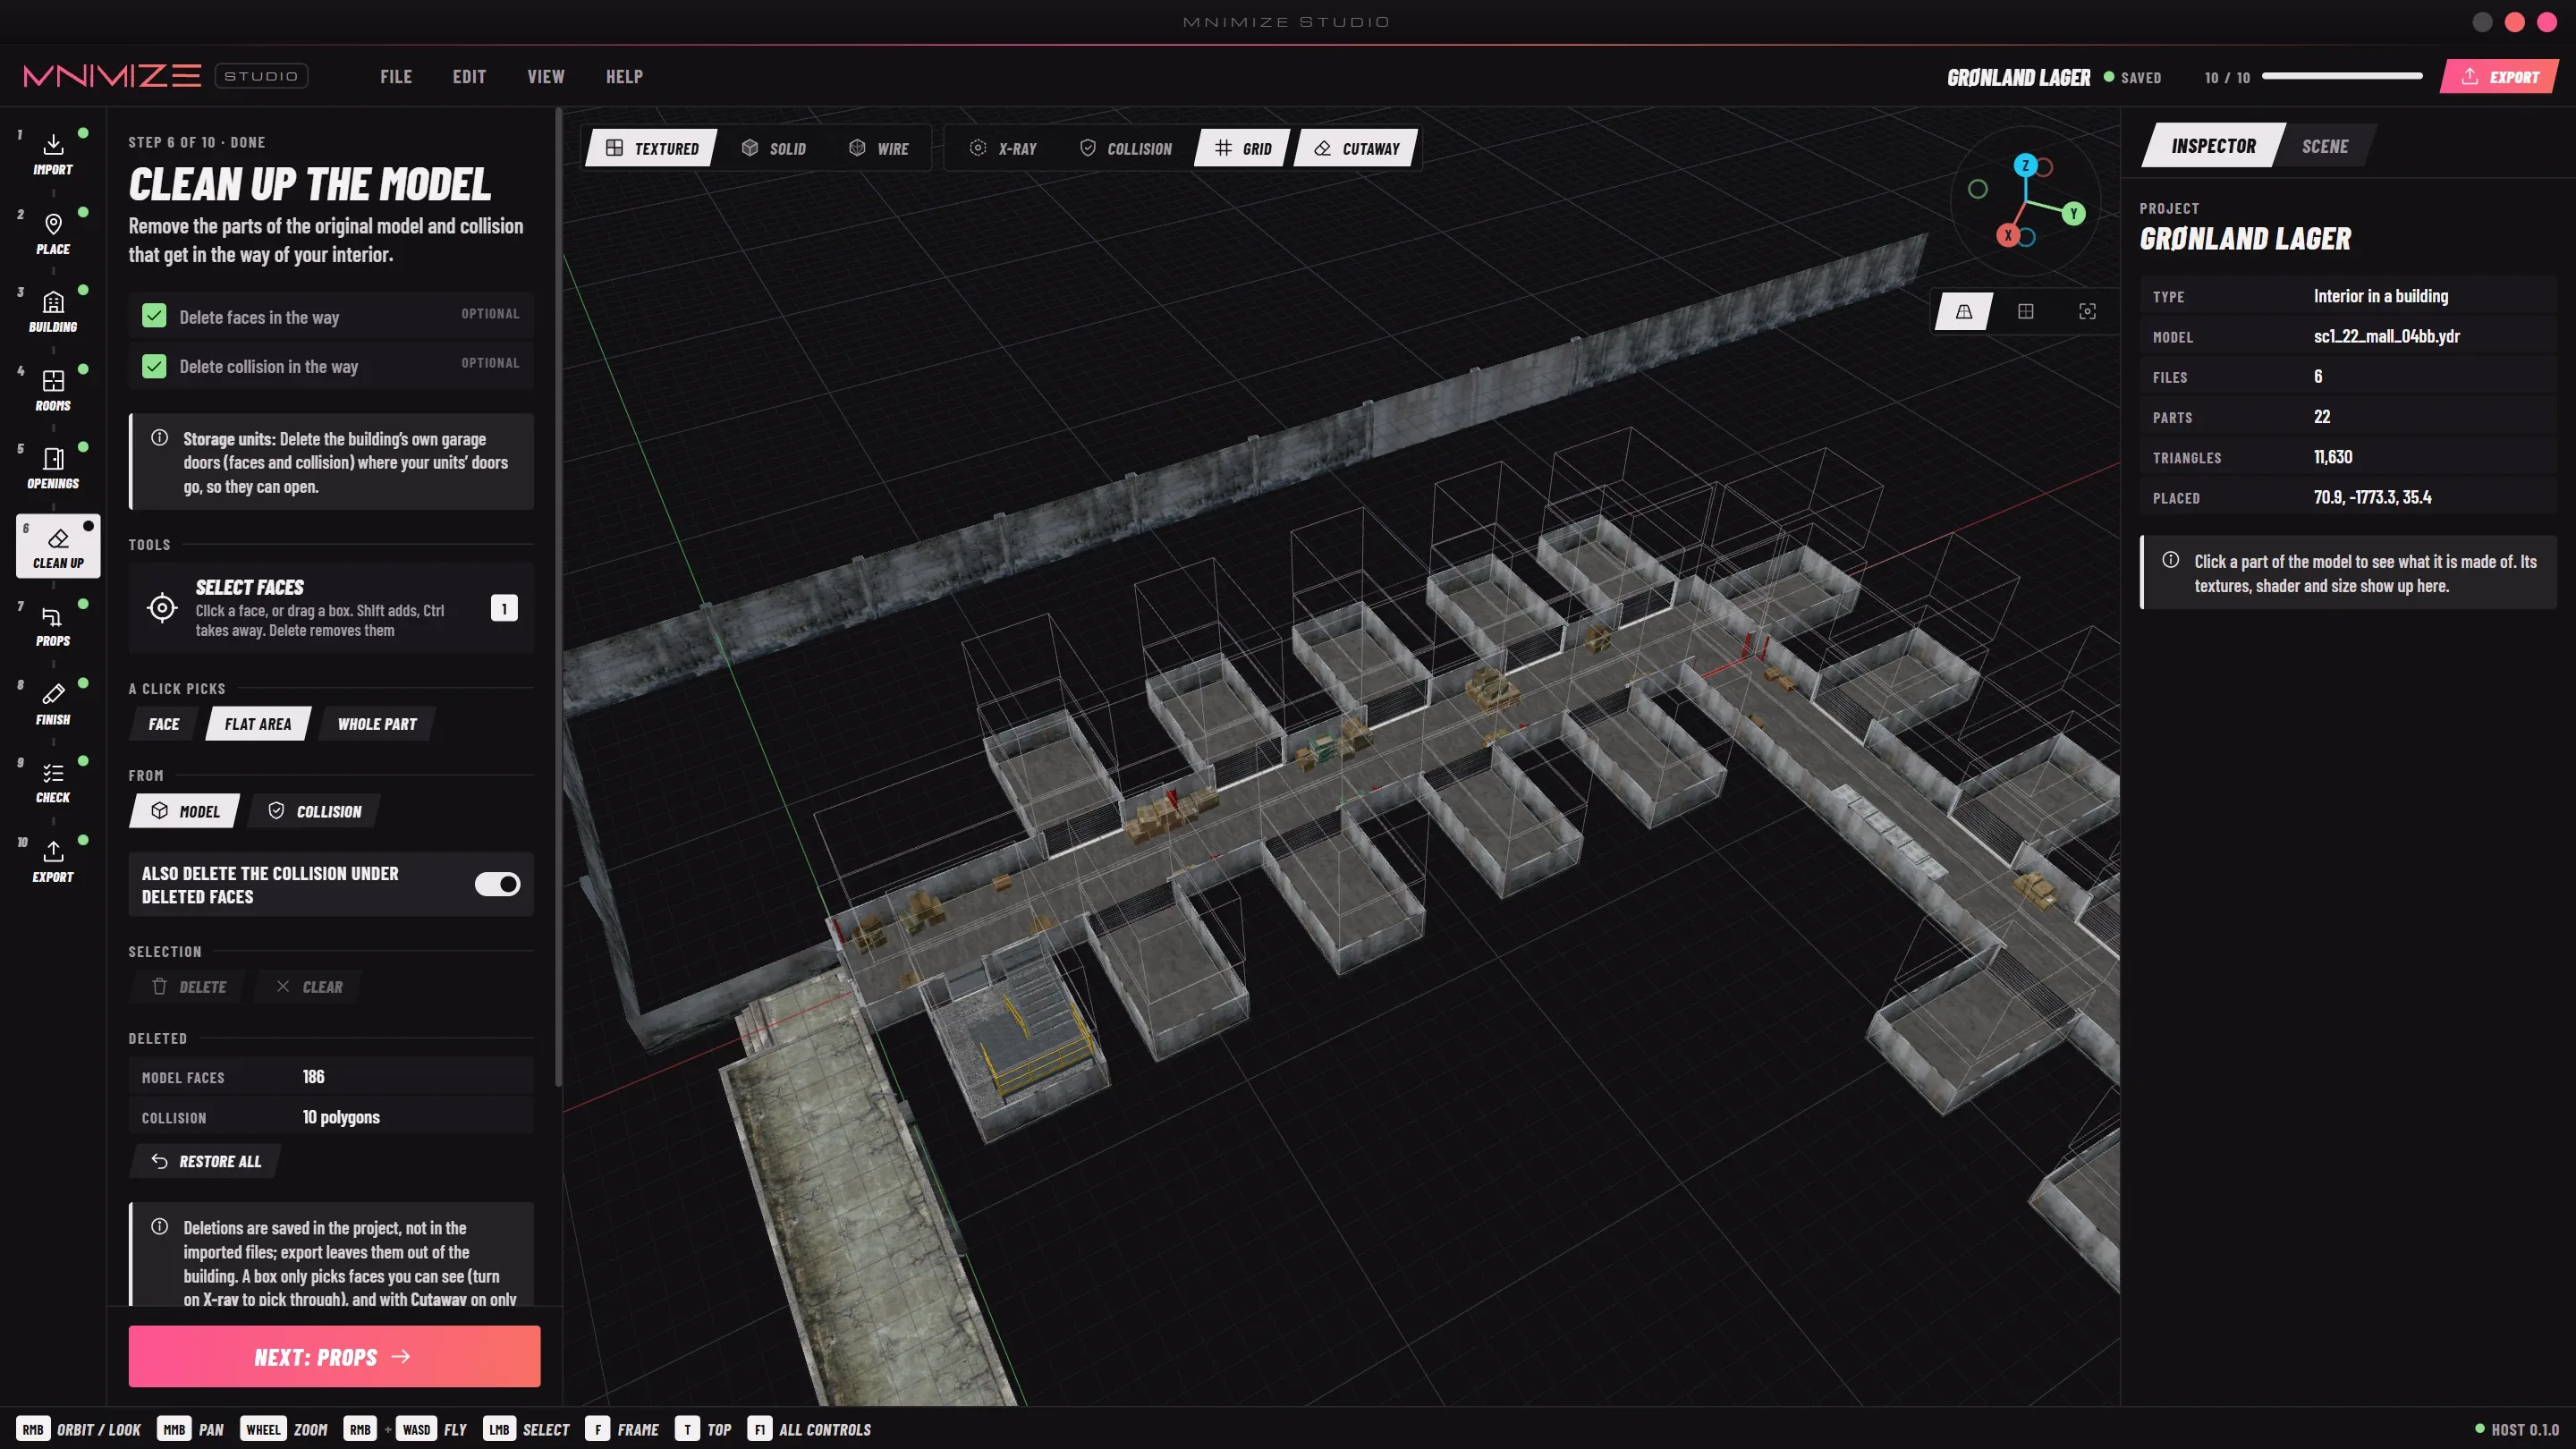
Remove the parts of the building that get in the way of your interior: the outside wall in front of a door or window, floors and walls inside your rooms, collision that blocks the way in. This step opens as soon as a model is imported.
- Pick Select faces (1). Choose what a click picks: a Face, a Flat area (the faces around it in the same plane) or the Whole part.
- Choose From: Model or Collision (once the
.ybnis imported). - Click, or drag a box. Shift adds, Ctrl takes away, Esc clears.
- Delete. With Also delete the collision under deleted faces on, the collision there goes too.
A box only picks faces you can see: turn on X-ray to pick through, and with the cutaway on, only what’s below the cut. Restore all brings everything back; so does Ctrl Z.
Deletions are kept in the project; your imported files aren’t changed. The export writes the building’s model and collision without them, under their original names, so they replace the game’s. Only one resource on a server can replace the same file.
Step 07
Props and pipes
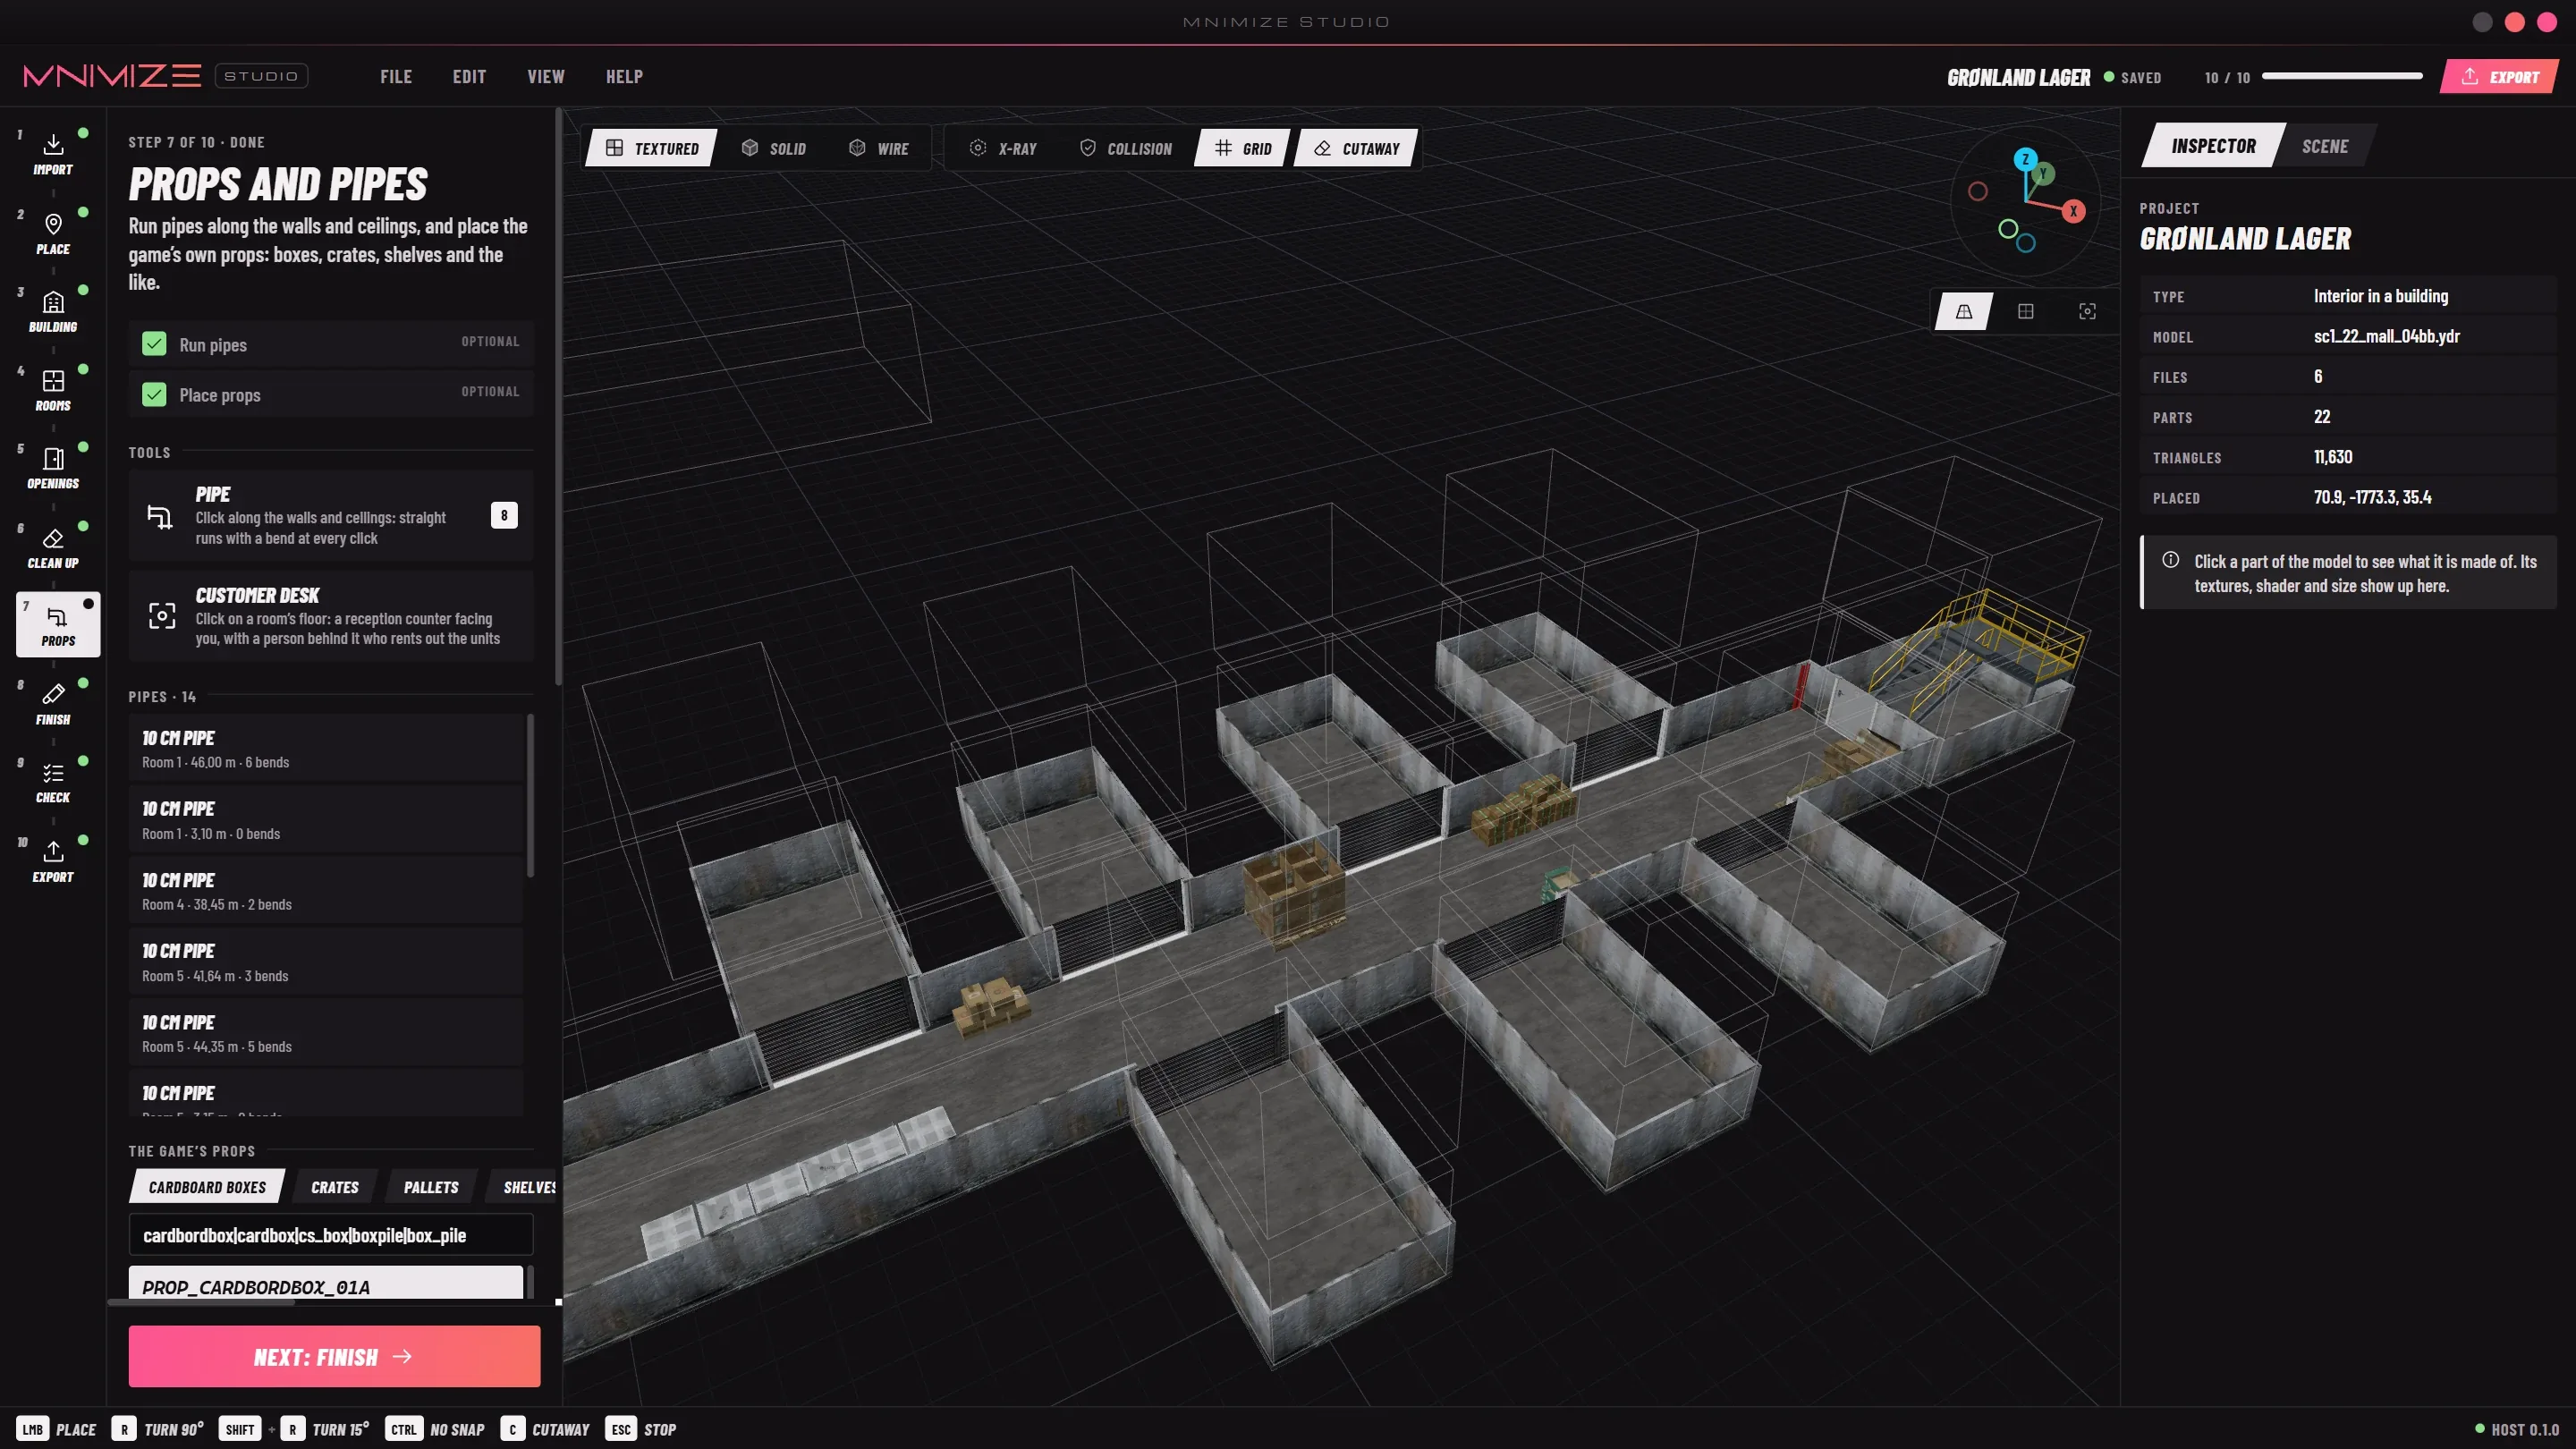
The game’s props
Pick a quick list (cardboard boxes, crates, pallets, shelves, barrels, tools, bags, bins, chairs, tables) or search all of the game’s props by name. Every word has to match, and | gives alternatives: crate|pallet. Each result shows its size.
- Click to place it on a floor, against a wall, under a ceiling or on top of another prop. It snaps to 5 cm; Ctrl places it freely.
- R turns it 90°, Shift R 15°. The prop stays on the cursor, so you can place more.
- The inspector has Facing (degrees), the height above the floor, On the floor and Place more.
Props go into the export as the game’s own models, so there’s nothing extra to stream. A prop outside every room is left out. Check stops any model your server’s game build doesn’t have.
Pipes
Pipe (8): click on a wall, the floor or the ceiling where the pipe starts, then once for every bend. Runs go straight along the grid or straight up and down, 3 cm off the surface. Click the last bend again, double-click or press Enter to finish. Turn the cutaway off (C) to reach the ceiling.
- Thickness from 2 to 40 cm (or any size), Roundness 6, 8 or 12 sides.
- Finishes from red sprinkler pipe to copper, PVC, galvanised and rusty iron.
- Elbow couplings, end caps and wall clamps are on to start with. Players bump into it gives the pipe collision; use it for pipes low down.
- Use for new pipes makes the selected pipe’s settings the ones new pipes get.
Customer desks are placed at this step too. See Customer desks.
Step 08
Finish the inside
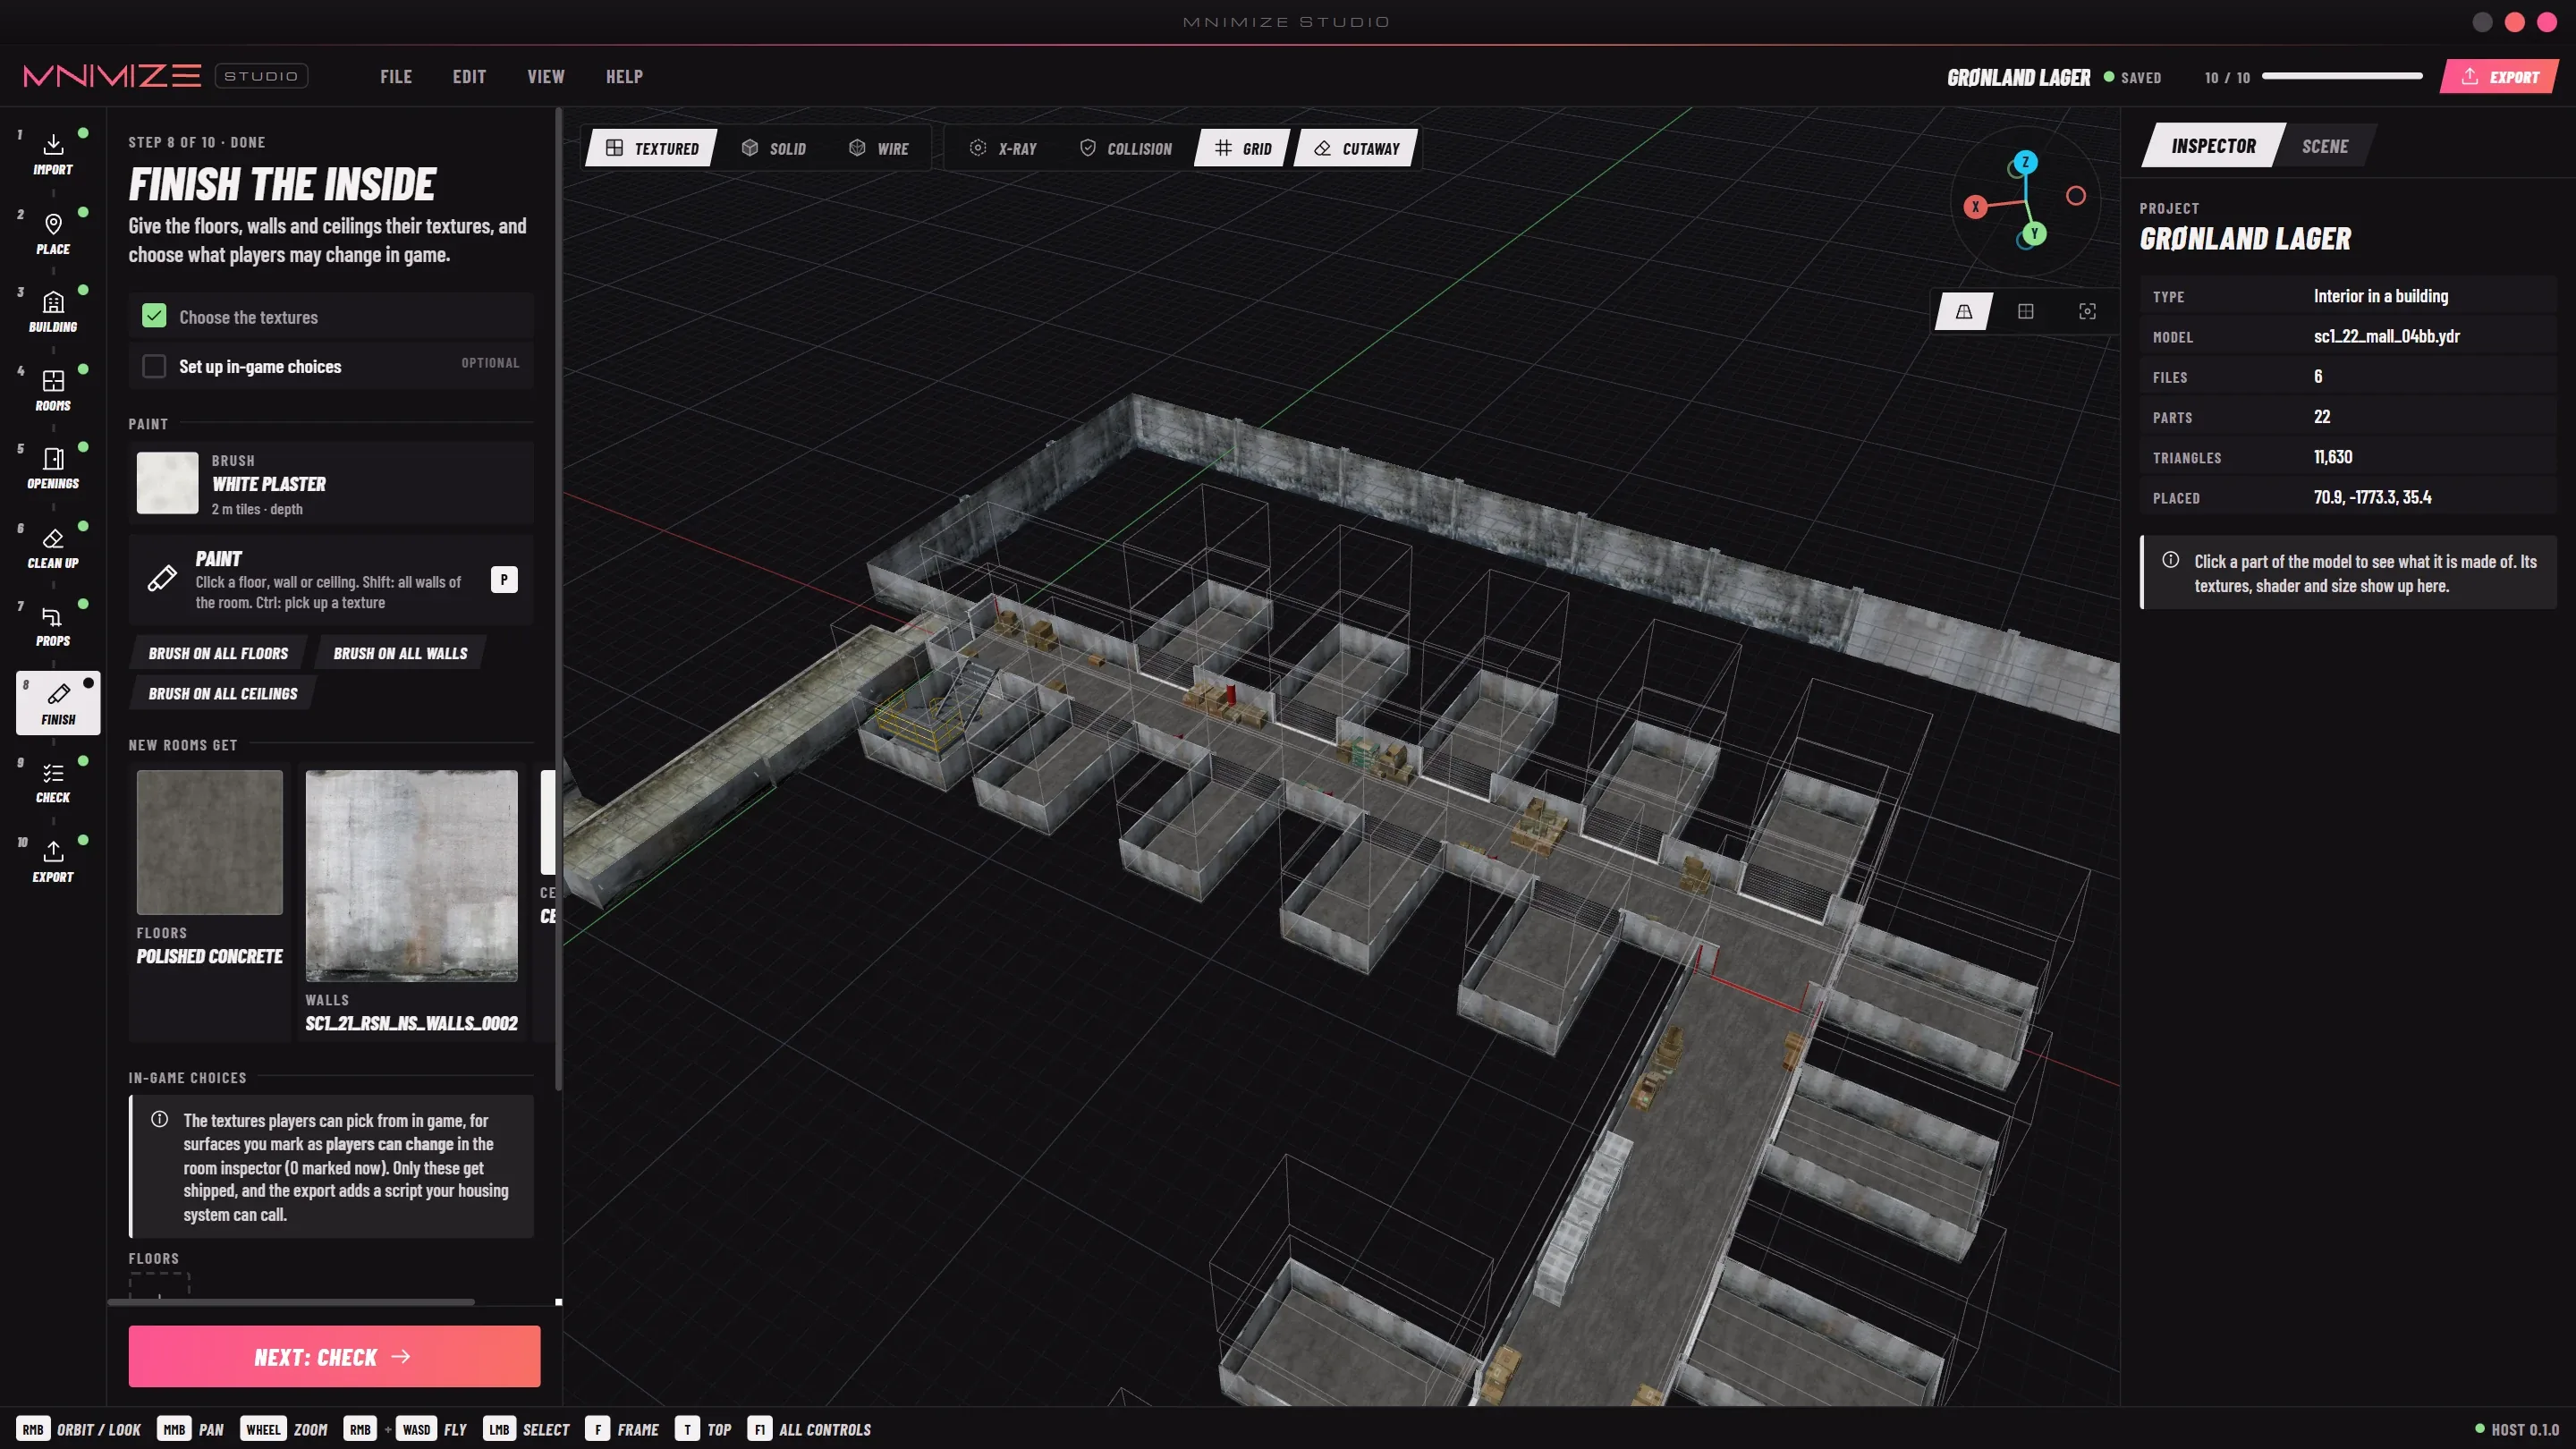
Paint
Pick a texture for the Brush, then Paint (P) and click a floor, a wall or a ceiling. A click on a wall paints that one wall; Shift paints every wall of the room; Ctrl picks up the texture you click. Brush on all floors, walls or ceilings does the whole interior at once. New rooms get sets what new rooms start with.
The texture picker
| Library | 92 textures, drawn and photographed: walls, floors, ceilings, trim, pipes. |
| From the building | The textures in the files you imported. Their own normal and spec maps come with them. |
| Your images | .png or .jpg. Square sizes like 512 or 1024 work best. |
| From GTA | The textures of a model in the game, such as its garage doors and shutters. |
Every texture has depth: under Depth & shine, the Normal map is made from the texture (or comes with it), Depth goes from flat to twice as deep, and Shine sets how glossy it is. Tile size is how many metres one copy of the texture covers.
Per room
The room inspector’s Finish shows the floor, walls and ceiling of the selected room, and how many walls are painted on their own. Make all the same evens them out.
Under Collision, each surface has a GTA material, so footsteps and bullet hits sound right. Auto guesses it from the texture’s name; pick one yourself if the guess is wrong. Glass (stops bullets) is there too.
Ceiling lights
Every room gets ceiling lights with shadows from its main lights. In the room inspector:
- Warm, Neutral or Cool; Dim, Normal or Bright; Dense, Normal or Sparse (about 2.5, 3.5 or 4.5 m apart).
- Shadows (the 1–3 main lights).
- Without the lights: how dark the room is with them off (Dark, Dim or Soft).
Looks players can buy
This step is also where you choose the looks players can pick from in game. See Surfaces players change.
Step 09
Check it
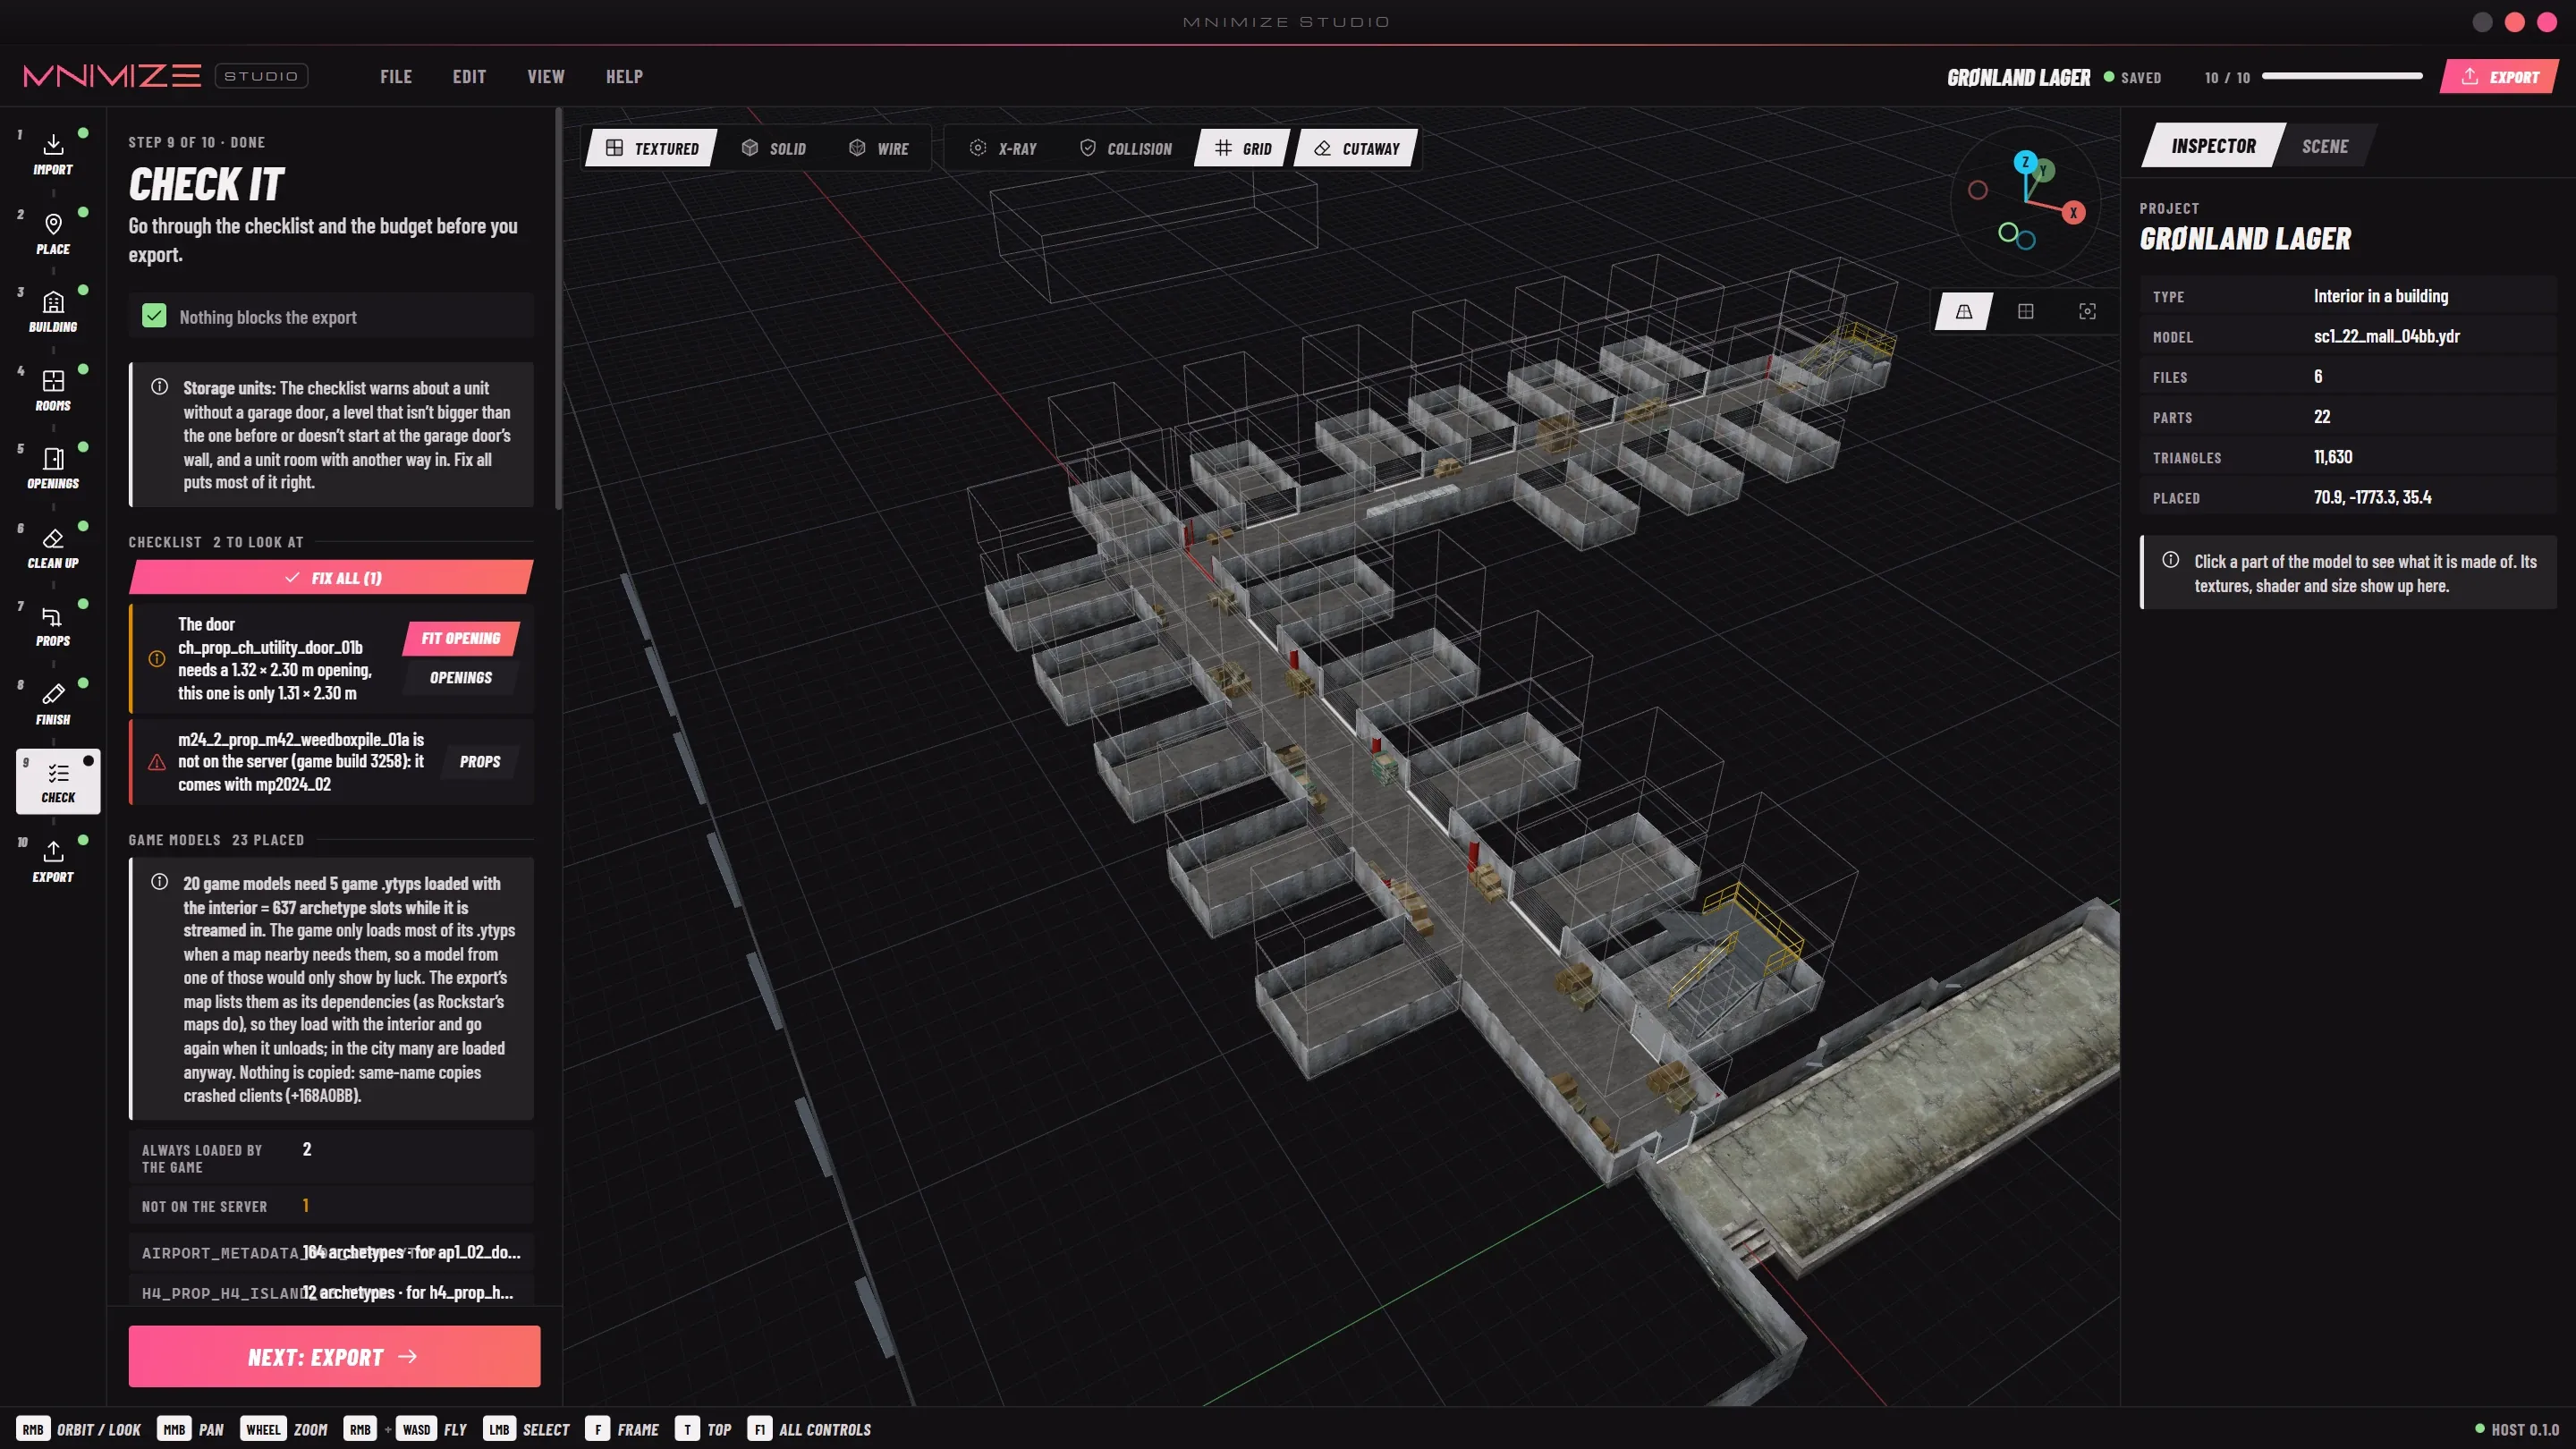
The checklist
Studio goes through the interior and lists what it finds. Red items are errors and stop the export; the rest are warnings worth a look. Most items have a button that fixes them, and one that shows you where the problem is. Fix all makes every fix in a sensible order; Edit › Undo takes them back one by one.
| You see | What to do |
|---|---|
| Two rooms overlap | Cut back or Pull apart, or move one yourself. |
| An opening is off its wall | The room moved without it. Put it back on its wall. |
| No door or archway leads outside | Players could only get in by teleporting. Add one at Openings. |
| Doors and windows to the outside still have the building’s wall in front of them | Delete those faces at Clean up. |
| A model is not on the server | It comes with a DLC newer than your server’s game build. Pick another one. |
| Can’t check the game models | Studio couldn’t read GTA V. See Troubleshooting. |
| Props or pipes stand outside the rooms | They’re left out of the export. Move them inside. |
| A door is too high for steps | Put stairs there instead. |
Game models
Every game door and prop you placed is checked against the game build Studio exports for, build 3258. A model that only comes with a newer DLC stops the export, so nothing turns up invisible on your server. Models the game doesn’t keep loaded are loaded with the interior on purpose, so a door or prop never depends on luck to show up. The section lists which game files that takes.
The budget
Per room: triangles and draw calls (one per material). For the whole interior: textures (about how much video memory), the in-game looks, portals and lights. A number turns amber above these, but it doesn’t stop the export:
- 25,000 triangles or 12 materials in one room
- 64 MB of textures in all
- 25 MB of looks players can buy
Step 10
Export the resource
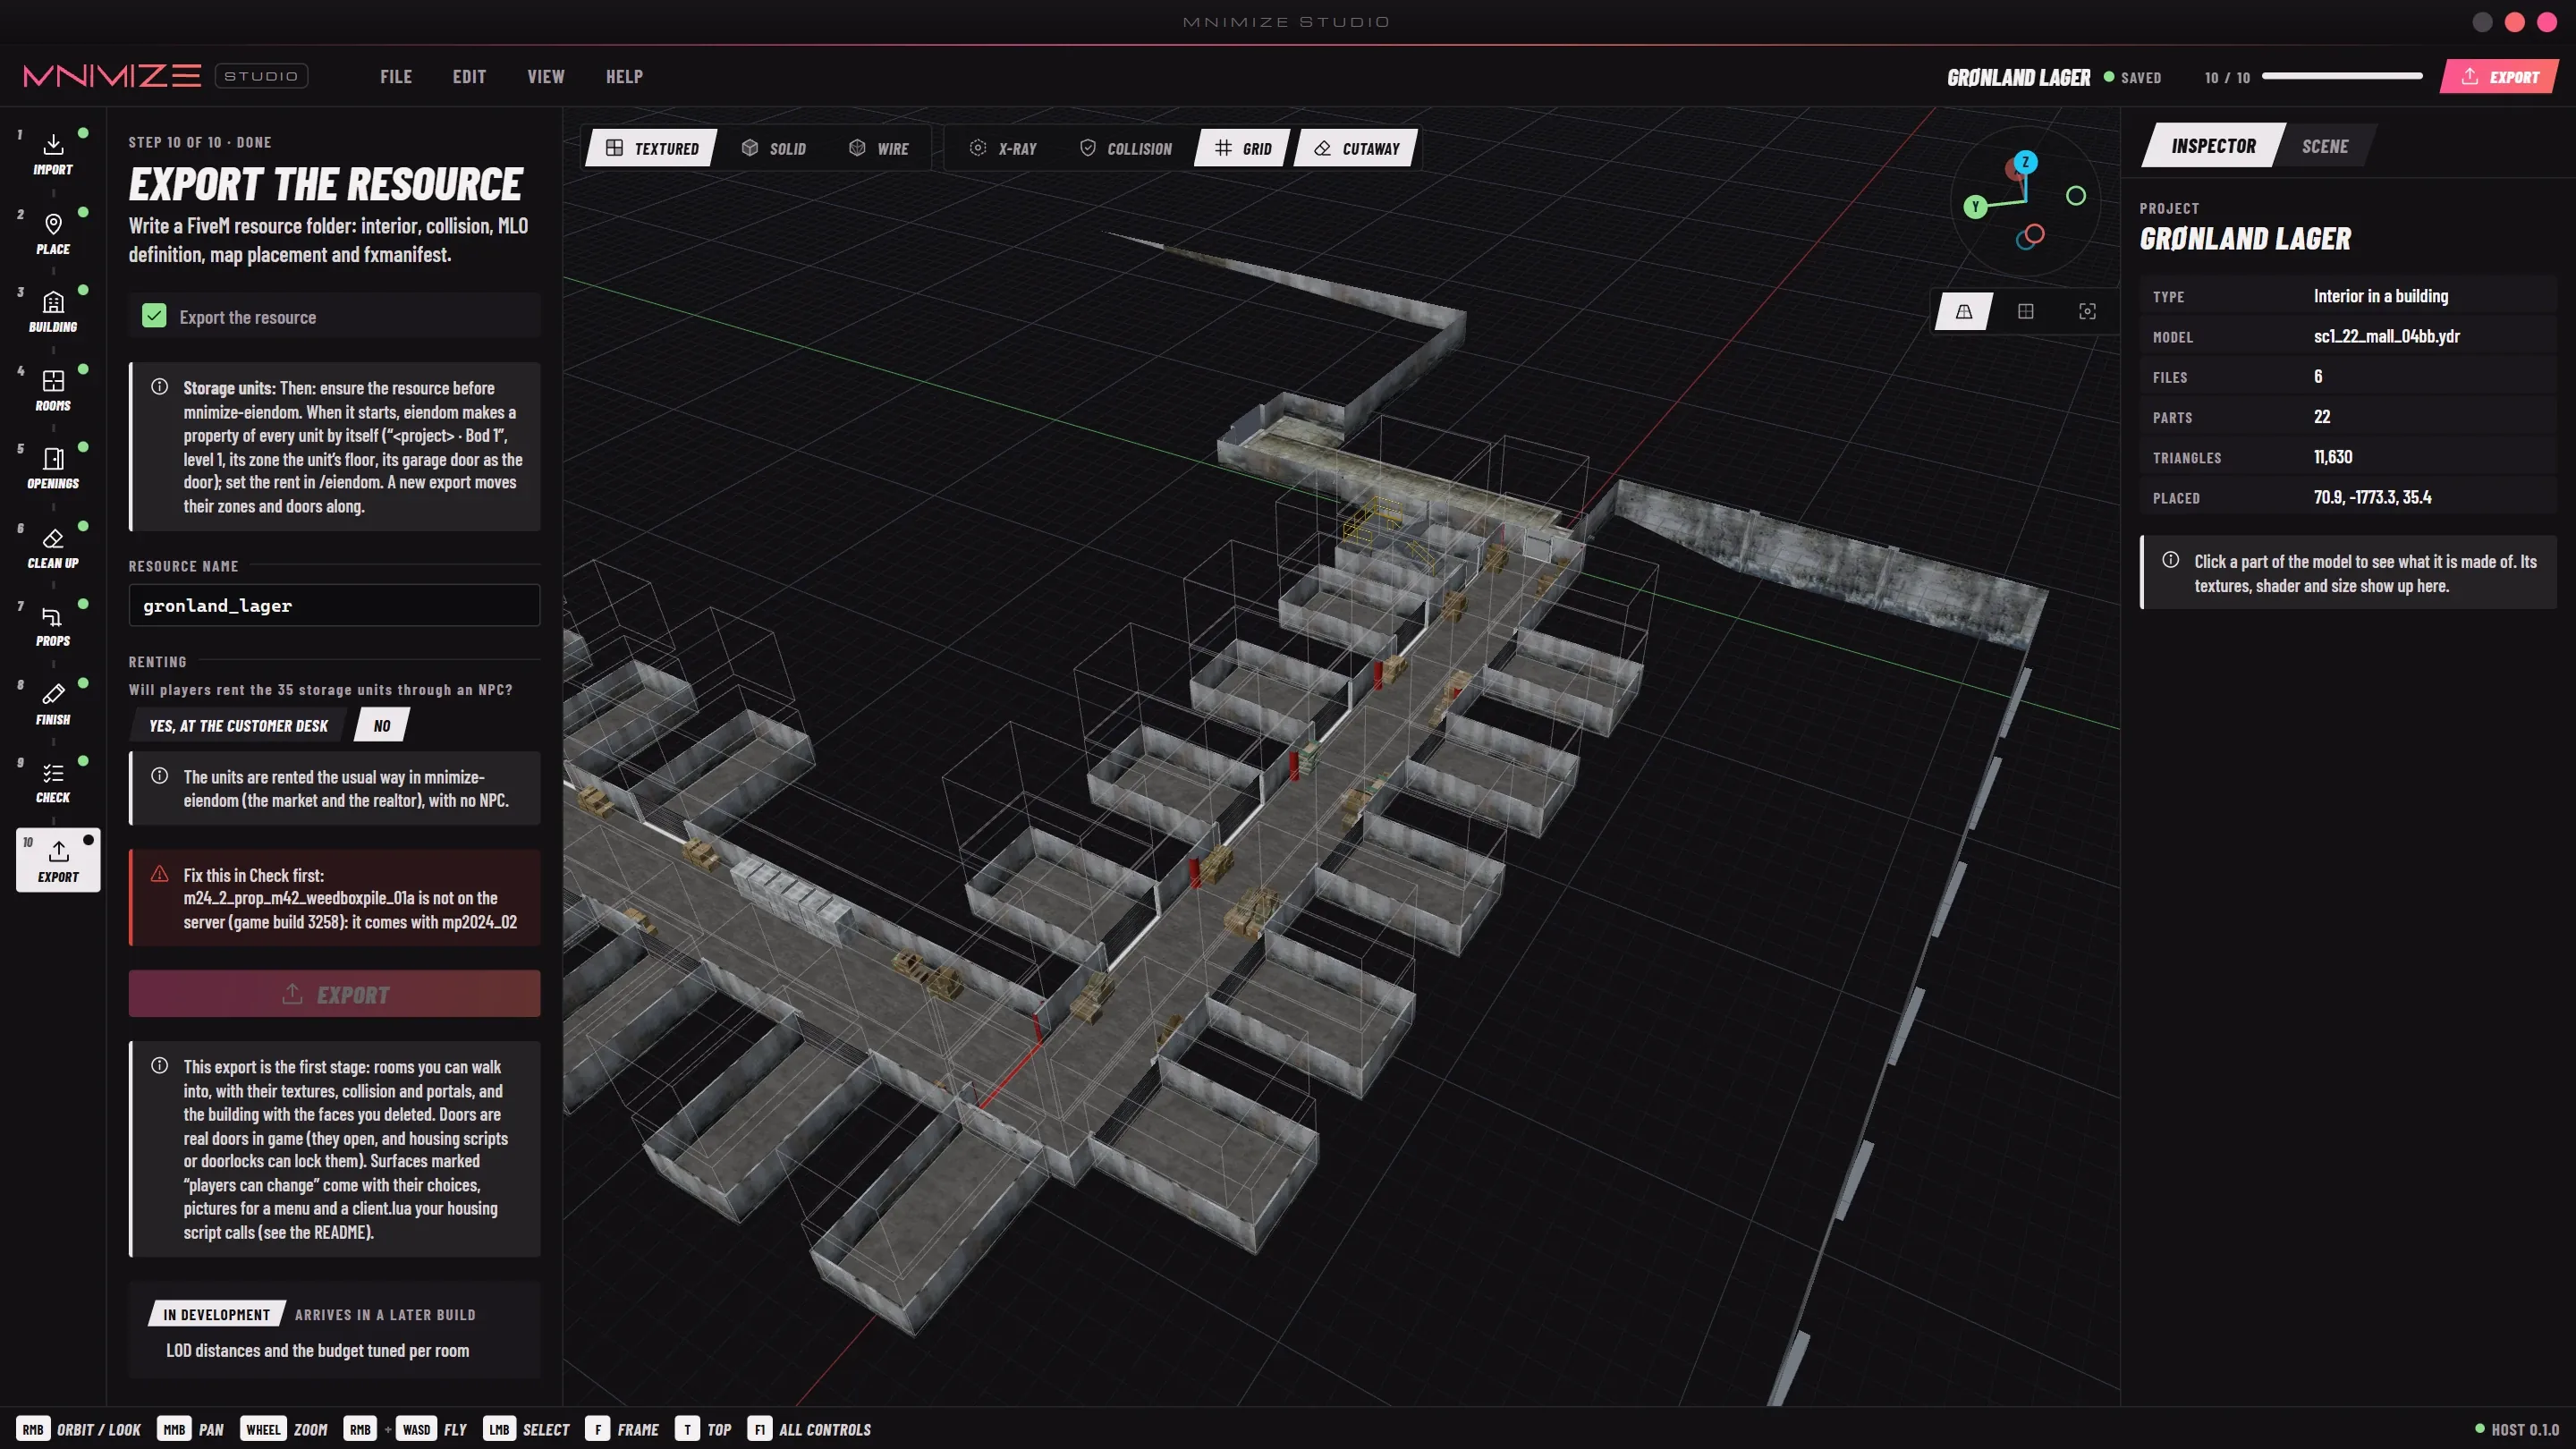
- Resource name: what you’ll
ensure. It starts from the project’s name. Use a to z, 0 to 9 and_, start with a letter, 2 to 40 characters. - If the interior has storage units or labs, answer Will players rent … through an NPC?: Yes, at the customer desk or No. See Customer desks.
- Export. The button shows what it’s doing: the rooms, the textures, the menu pictures, the game files.
When it’s done, Studio lists every file it wrote, with its size and any warnings, and Open folder takes you to it. The resource goes in Documents\MNIMIZE Studio\Exports\<name>.
Exporting again rewrites the folder. Studio only does that to folders it made itself: if a folder with that name was made some other way, it asks you for another name.
Next: what’s in the folder and how to put it on your server.
Features
Storage units
A storage unit is a room players rent, behind a garage door, that grows when they buy an upgrade. Draw it at up to five sizes; in game only the size the renter has is there.
Make one
- Draw the unit at its smallest size. Its only way in should be the garage door.
- In the room inspector: Storage unit › Make it a storage unit. Units are numbered by themselves.
- Add garage door puts one in, on the wall to the hallway if there is one (up to 3 × 2.5 m, as much as the wall has room for).
- + Bigger size adds the next size: 2 m deeper at the back, and from size 3 on also wider, as far as the neighbours allow. − Narrower and + Wider fine-tune a size by 25 cm a side.
- Every size is the whole unit at that size, starting at the same front wall as the others.
- Once a unit has two sizes, Storage units and labs · show size on the Rooms step shows every unit at size 1, 2, 3…
- Same widths in every unit, Duplicate unit (all its sizes, as the next number), Remove size and Not a unit are in the unit panel.
Check makes sure every size covers the one before it, starts at the same front wall and stays on the same floor, and fixes it when it doesn’t. The export writes every unit at every size as models of its own, the garage door panels, and units.json for your housing script.
Labs
A lab (weed, coke, a money wash…) is a room behind a door from a hallway. It only spawns while its door is open or someone is inside, and it grows through sizes the same way as a storage unit, without the garage door.
- Room inspector: Lab › Make it a lab. Give it a Name in game, like Weed lab.
- Give it a door, not an archway: the lab spawns when the door opens.
- Props you place in a lab appear from the smallest size they stand in.
The export writes labs.json for your housing script.
Customer desks
A reception counter with someone behind it who rents out the storage units or labs. Place it at the Props step: pick Customer desk and click a room’s floor. It faces you.
- Width from 1.2 to 3 m, Straight or an L to either side. The customers’ side has a ledge at 1.09 m, with a worktop at 75 cm behind it.
- Someone stands behind the desk: a man or woman in a suit, security, a shop assistant, a warehouse worker, or any ped model you type in.
- R turns it. Keep the desk and the spot behind it inside the room.
At Export, Yes, at the customer desk writes desks.json: where the person stands, which way they face and the ped model. Your housing script spawns them and lets players rent through them. The figure you see in Studio isn’t exported.
Surfaces players change
Let players restyle a room in game: the floor, the ceiling, all the walls, or each wall on its own, from looks you pick. The swap happens while they stand in the room. No reload, no restart.
- In the room inspector, under Players can change in game, switch on Floor, Walls and/or Ceiling.
- At the Finish step, a row for each kind of surface appears. Click + (Add a choice) and pick the looks. You can select several at once and Add them together.
- Export. The room starts with the texture you painted; the looks are what players can switch to.
- Every wall is a slot of its own, so one wall can differ from the rest.
- Each look is its own small texture dictionary, loaded only while it’s in use, with a picture for your menu.
- The collision stays as built: a new floor look changes how it looks, not how it sounds.
- Ten to twenty looks per kind of surface is plenty. Check warns above 25 MB.
The export writes surfaces.json and a client.lua with exports your scripts call.
Rentable interiors
A Rentable interior project has no building. You draw rooms on an empty grid, and the export hides the interior underground, with a copy for every upgrade level. It’s made for housing scripts that give each renter a copy of their own, in a routing bucket of their own.
- It has six steps: Rooms, Openings, Props, Finish, Check and Export.
- Each room has Opens at upgrade level, 1 to 5. Level 1 rooms are there from the start; higher ones open up behind a wall when the renter buys the upgrade.
- At Openings, mark the door players come in and leave by: Entrance (players come in and leave here). It has to be in a level 1 room.
- At Export, pick one of 25 Hidden spots, or My own spot with a
vector3from the game. Each upgrade level is its own MLO, 40 m under the one before. - Windows to the outside look into nothing, since the interior is underground.
The export adds interior.json, with every level’s map, origin and the spot players arrive at.
MLOs you already have
Two tools work on MLOs made by you or anyone else, escrowed ones too. Open them under Tools on the start screen, or from the File menu: Audio occlusion and Lights.
- Choose folder…: one MLO’s resource folder, or a whole folder like
[mlo]with many. Studio scans it straight away (or paste a path and click Scan). - Studio reads the MLOs’
.ytypand.ymapfiles and lists every placement. - Tick what you want and write it. The result goes into a resource of its own next to the MLO’s.
ensureit and reconnect.
The MLO’s own files are never touched, and Studio won’t write inside the MLO’s resource.
Audio occlusion
Works out which room hears which, through which doorways, and writes it to <resource>_occlusion (or mnimize_occlusion for a folder of resources). MLOs without occlusion are ticked; MLOs that ship their own are left as they are. Those without, All and None change the selection, then Write occlusion.
Lights
Ceiling lights for rooms that have none: only the light, no lamp. Pick Warm, Neutral or Cool and a Brightness from 40 to 200%. Dark rooms are ticked to start with. The lights go every 3.5 m, up to 24 per room, into <resource>_lights. Its script shows them when a player is near.
To take lights away, untick the rooms and write again.
On your server
The export folder
One ordinary resource with everything in it, audio occlusion included. Nothing to convert or pack afterwards. What a storage facility called gronland_lager gets:
- fxmanifest.luastreams it, registers the .ytyp and the audio
- README.mdhow to start it, where to teleport in
- units.json · labs.json · desks.jsonfor your housing script, when the interior has them
- surfaces.json · client.luawhen players can change surfaces
- thumbs/a picture of every look, for your menu
- audio/
- gronland_lager_game.dat151.relaudio occlusion: rooms and doorways
- stream/
- gronland_lager.ytypthe MLO: rooms, portals, doors
- gronland_lager_mlo.ymapplaces it in the world
- gronland_lager_manifest.ymfwhat loads with it
- gronland_lager_col.ybncollision, a material per surface
- <number>.ymtaudio occlusion paths
- gronland_lager_room1…N.ydrthe rooms, one model each
- gronland_lager_lightsN.ydrceiling lights
- gronland_lager_txd.ytdtextures, compressed, with mipmaps
- gronland_lager_u1l2.ydr …each unit and lab at each size
- gronland_lager_gdoor*.ydrgarage door panels
- gronland_lager_c_N.ytdone small dictionary per look players can buy
- sc1_22_mall_04bb.ydr …the building, minus the faces you removed
-- Made with MNIMIZE Studio
fx_version 'cerulean'
game 'gta5'

this_is_a_map 'yes'

data_file 'DLC_ITYP_REQUEST' 'stream/gronland_lager.ytyp'

file 'audio/gronland_lager_game.dat151.rel'
data_file 'AUDIO_GAMEDATA' 'audio/gronland_lager_game.dat'

mnimize_units 'units.json'

mnimize_desks 'desks.json'

files {
    'units.json',
    'desks.json',
}
The mnimize_units, mnimize_labs, mnimize_desks, mnimize_surfaces and mnimize_interior lines are only there when the interior has them. They tell scripts which file to read (see For scripters).
Put it on your server
- Copy the export folder into your server’s
resources. - Add it to
server.cfg, then restart the server:
ensure gronland_lager- Reconnect. The README has the coordinates of the first room, so you can teleport straight in.
The export carries the building’s own model and collision, with the faces you deleted taken out, under the game’s file names. If another resource on your server replaces the same building, only one of them wins. Keep one.
- The interior is a standard MLO, so door, target and housing scripts see it like any other.
- Exports run next to the MLOs you made or bought. Doors and props from another resource’s
.ytypneed that resource running too; Check reminds you. - Studio exports for game build 3258. A server on an older build may be missing models from the newest DLCs.
For scripters
What your scripts can use from an export. Everything is in world coordinates, headings in degrees, sizes in metres. Fields with no value are left out.
Finding the files
Each data file is named in the fxmanifest, so a script can find it in any resource Studio made:
-- every started resource that has storage units
for i = 0, GetNumResources() - 1 do
    local res = GetResourceByFindIndex(i)
    local file = GetResourceState(res) == 'started'
        and GetResourceMetadata(res, 'mnimize_units', 0)
    if file then
        local data = json.decode(LoadResourceFile(res, file))
        print(res, data.label, #data.units .. ' units')
    end
end
Surfaces: the exports in client.lua
When players can change surfaces, the export’s own client.lua does the swap. Call it from any client script. Rooms are numbered from 1, the way they’re listed in Studio; slots are 'floor', 'ceiling', 'wall1', 'wall2'… or 'walls' for every wall. A look is its id in surfaces.json; 0 or nil goes back to the look it was built with.
-- room 2's floor gets look 8
exports['comicbookstore']:SetSurface(2, 'floor', 8)

-- one wall on its own, or every wall of the room
exports['comicbookstore']:SetSurface(2, 'wall2', 6)
exports['comicbookstore']:SetSurface(2, 'walls', 1)

-- a whole room at once; slots left out go back
exports['comicbookstore']:ApplySurfaces({ [2] = { floor = 8, walls = 1, ceiling = 19 } })

-- back to the look it was built with: these rooms, or all when nil
exports['comicbookstore']:ResetSurfaces({ 2 })

-- the contents of surfaces.json, for your menu
local data = exports['comicbookstore']:GetSurfaceData()SetSurfacereturnsfalsewhen the room, the slot or the look doesn’t exist. InApplySurfaces, awallsentry covers the walls not named on their own.- The swap only happens on the client that calls it. Your script applies it for every player near the room, and again when a player joins or the resource restarts.
- Each look’s texture dictionary is loaded when it’s first used and let go when nothing uses it. Stopping the resource puts every room back.
surfaces.json
Which surfaces can change, and the looks for each kind. facing is the compass direction a wall faces (n, e, s, w) and length its length, handy for a menu. thumb is the look’s picture in the resource.
{
  "version": 3,
  "txd": "comicbookstore_txd",
  "rooms": [
    { "id": 2, "label": "Shop floor", "surfaces": {
        "floor": { "kind": "floor", "diffuse": "…", "normal": "…", "spec": "…" },
        "wall2": { "kind": "walls", "wall": 2, "facing": "e", "length": 6.4,
                   "diffuse": "…", "normal": "…", "spec": "…" }
    } }
  ],
  "choices": {
    "floor": [
      { "id": 8, "label": "Light oak", "thumb": "thumbs/c_8.jpg",
        "txd": "…", "diffuse": "…", "normal": "…", "spec": "…" }
    ],
    "walls": [ … ],
    "ceiling": [ … ]
  }
}
Looks are numbered from 1 within each kind (floor, walls, ceiling), and only kinds that some room lets players change are listed.
units.json
Every storage unit, its sizes and its garage door.
{
  "version": 1,
  "label": "Grønland lager",
  "units": [
    {
      "id": 1,
      "label": "Unit 1",
      "room": "unit_1",
      "center": [x, y, z],
      "levels": [
        { "level": 1, "area": 9.6, "rooms": 1,
          "zone": { "points": [[x, y, z], …], "minZ": 29.7, "maxZ": 33.3 } },
        { "level": 2, … }
      ],
      "levelProps": ["gronland_lager_u1l1", "gronland_lager_u1l2"],
      "place": { "at": [x, y, z], "heading": 90.0 },
      "door": {
        "model": "gronland_lager_gdoor1p1", "at": [x, y, z], "heading": 90.0,
        "width": 3.0, "height": 2.5,
        "sectional": { "count": 5, "section": 0.5, "thick": 0.04,
                       "top": …, "radius": …, "travel": …, "inward": [0, 1, 0] },
        "panels": ["gronland_lager_gdoor1p1", "gronland_lager_gdoor1p2", …]
      },
      "blockers": []
    }
  ]
}
room | The unit’s room in the MLO. |
levels[].zone | The floor outline at that size, with the height it spans: the area that belongs to the renter. |
levelProps, place | The model of each size (the first is size 1). Spawn the renter’s size at place, inside the unit’s room. |
door | The garage door. Studio’s own sectional door comes as panels, bottom first, that your script runs along the track in sectional: up and back under the ceiling. A game garage door has only model, at, heading, width and height. |
labs.json
Every lab: the model and floor outline of each size, its props, and its door.
{
  "version": 1,
  "label": "…",
  "labs": [
    {
      "id": 1, "label": "Weed lab", "room": "…", "center": [x, y, z],
      "levels": [
        { "prop": "…", "area": 24.0, "zone": { "points": [ … ], "minZ": …, "maxZ": … } }
      ],
      "place": { "at": [x, y, z], "heading": 0.0 },
      "props": [
        { "model": "prop_…", "at": [x, y, z], "heading": 180.0, "level": 1 }
      ],
      "door": {
        "leaves": [ { "model": "…", "at": [x, y, z], "heading": 90.0, "door": 1 } ],
        "middle": [x, y, z]
      }
    }
  ]
}
Spawn the lab’s size at place while its door is open or someone is inside. A prop’s level is the smallest size it’s there at. door.middle is the doorway, to tell when the door opens.
desks.json
The people behind the customer desks. Written when you answer Yes, at the customer desk at Export.
{
  "version": 1,
  "label": "Grønland lager",
  "desks": [
    { "id": "desk1", "at": [x, y, z], "heading": 180.0, "model": "a_m_y_business_03" }
  ]
}
at is where the person stands and heading faces the customers.
interior.json
Rentable interiors only: one entry per upgrade level, each its own MLO.
{
  "version": 1,
  "label": "…",
  "onDemand": true,
  "levels": [
    { "level": 1, "mlo": "…", "ymap": "…", "area": 42.5, "rooms": 3,
      "origin": [x, y, z], "entry": [x, y, z, heading] }
  ]
}
Load a level’s ymap while someone is inside it, and put players at entry.
Help
Troubleshooting
GTA V wasn’t found
Doors then show as boxes of their size, and Check can’t check the game models, which stops the export. Open a door’s Game door list and click Find GTA5.exe to point Studio at the game.
Next is greyed out, or a step is locked
Next waits until the step’s required checklist items are ticked. A step on the rail opens when every step before it is done. Props and Finish wait for a door or archway to the outside.
Players walk into a wall at the door
The building’s own wall is still in front of the opening. Delete those faces, and their collision, at Clean up.
The interior doesn’t show up in game
- Check the resource is
ensured, restart, and reconnect. - Make sure no other resource replaces the same building (see Put it on your server).
- Doors or props from another resource need that resource running.
“…already exists and was not made by MNIMIZE Studio”
There’s a folder with that name in Exports that Studio didn’t make. Pick another Resource name, or move the folder.
Updates don’t install
Studio’s folder has to be one you can write to. Move it out of Program Files, into Documents for example.
Still stuck?
Ask in the MNIMIZE Discord. Studio’s log helps: %LOCALAPPDATA%\MNIMIZE Studio\logs\host.log.
Where Studio keeps things
| Projects | Documents\MNIMIZE Studio\Projects, a folder each, with the files you imported |
| Exports | Documents\MNIMIZE Studio\Exports |
| Logs, caches, updates | %LOCALAPPDATA%\MNIMIZE Studio |
| Where GTA V is | %LOCALAPPDATA%\MNIMIZE Studio\game.json |
To keep everything next to Studio instead, on a USB stick for example, put an empty file called portable.txt next to MnimizeStudio.exe.
Missing something?
Tell us in the Discord what you were looking for, and it goes in the docs.